Adventures in questionable optics
Some time ago, I found out that it is possible to buy reasonably cheap optical elements of questionable quality from AliExpress. What do we do with them though? After learning a bit of optics, I figured that the easiest target should be a 1:1 macro lens. These can be easily constructed symmetrically from two identical mirrored halves, automatically correcting for some aberrations by construction.
P. S. You can skip over the rambling to the Picture dump section.
Some design specifications#
I figured I would like to build something with these properties:
1:1 magnification this both means we can exploit some properties of symmetrical lens systems and also classifies the lens as a (borderline) macro lens.
60mm working distance I just sort of held up a ruler and figured that this is a good enough distance. This should also correspond to something like 40-50mm of focal length.
Fixed aperture There are fairly cheap iris diaphragms on AliExpress, I figured I can leave that for a future iteration and just 3D print an appropriately sized hole. In the end I configured the lens to be about f/8.
Fixed focal distance In the end, the first iteration did end up with a focusing tube, it was mostly meant for tuning the sensor distance and not for actual focusing.
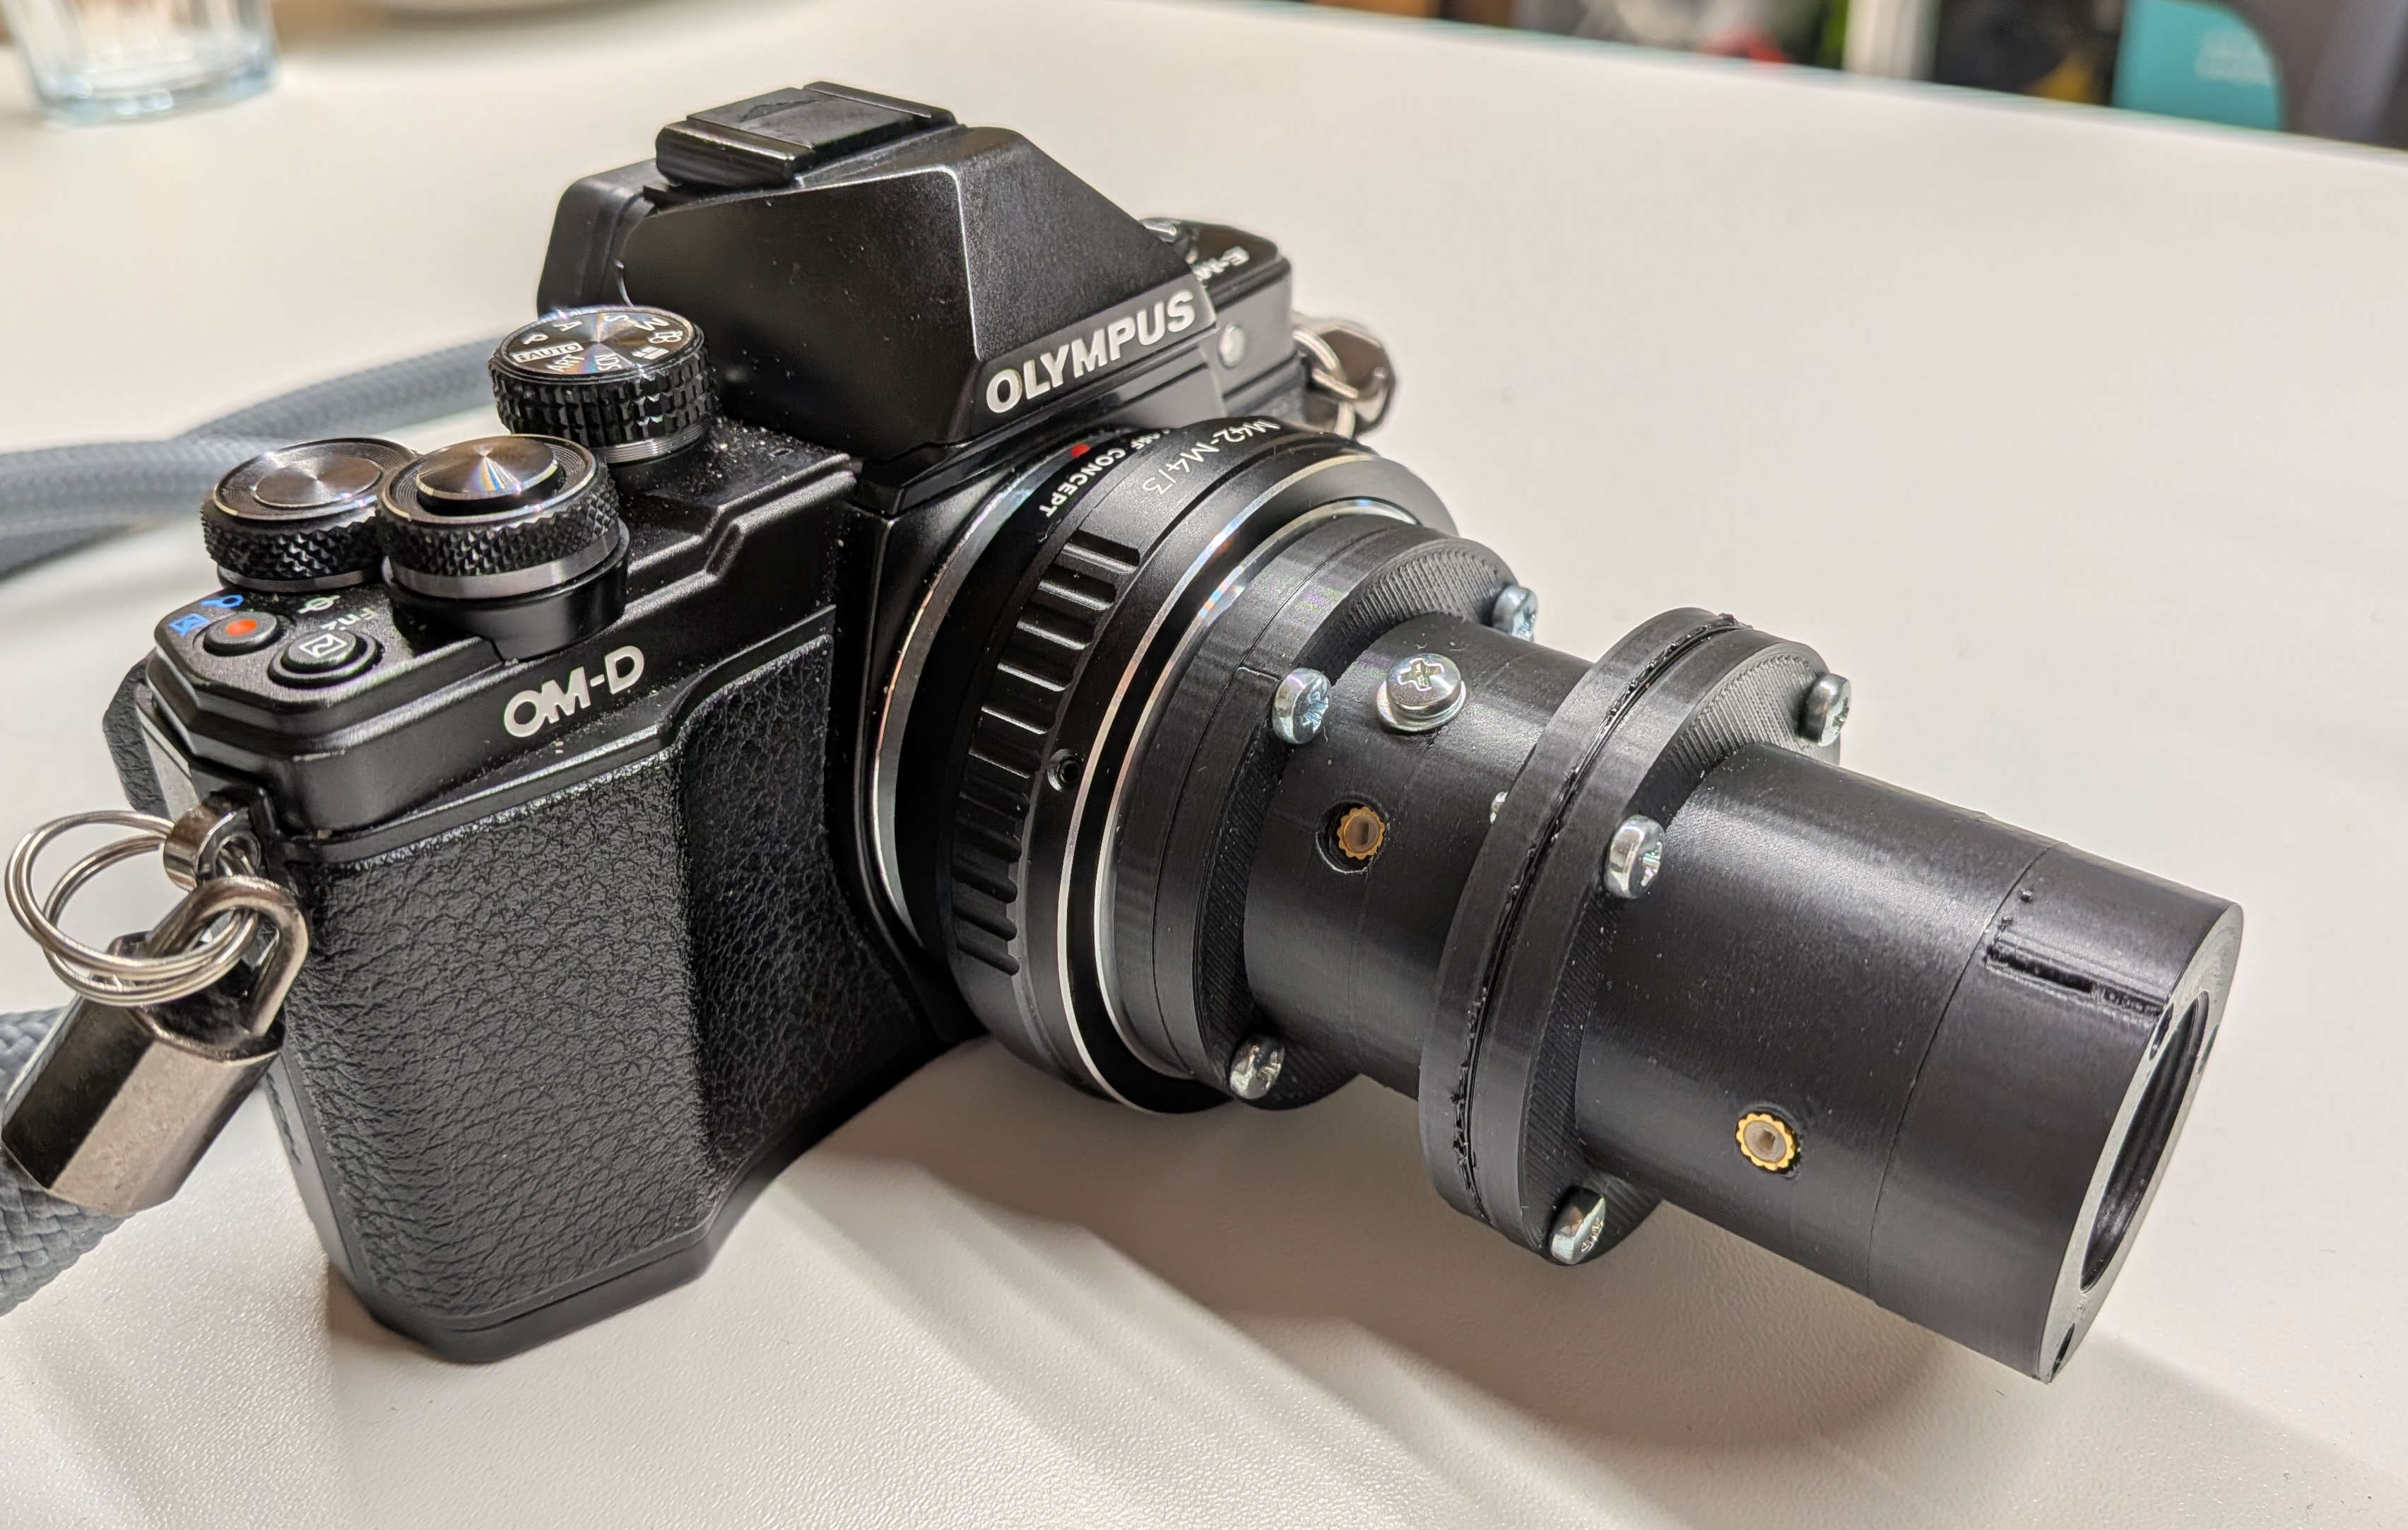
M42 mount I am ultimately using the lens with a Micro 4/3 camera, implementing it with an M42 mount means I do not have to fiddle with the mount directly on a live camera and can fiddle with it on a cheap adapter instead.
Optical design#
I chose the Rapid Rectilinear as my base design. This is a symmetrical design with two identical achromatic doublets, which should correct some aberrations by construction, and is relatively forgiving in terms of element parameters (remember we are buying premade doublets for 10$ from AliExpress, so specifying materials or geometry is out of question). In pictorial form, this design looks like this:
First, I used the online MeetOptics simulator to get a rough idea of what focal lengths the elements should have to get the desired working distance. The good news is that due to the symmetry of the design, the working distance also determines the distance from the rear element to the sensor, so we do not need to be worried about not fitting in the 45.46mm flange focal distance of the M42 mount. This worked out to needing two doublets with focal length around 60mm.
Next, I went to the open source library optiland to set up raytracing simulations of the design. That first required getting the actual geometry and materials of the doublets from the seller on AliExpress.
Even though the listing does not provide any geometry details, you can just use words to ask the seller for a datasheet and get a drawing like this:
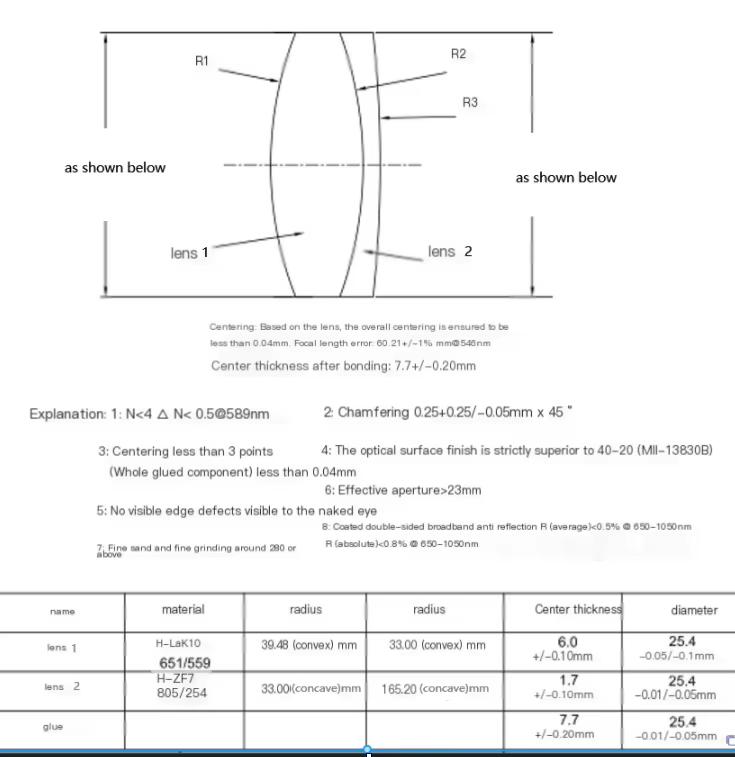
Judging by the geometry, this seems to be a clone of ThorLabs AC254-060-B-ML with what are probably functionally equivalent but differently named materials.*At this point, I should have been paying slightly more attention: although the focal length is specified at 546nm, the antireflective coating is optimized for 650nm to 1050nm. The AliExpress listing discloses this as well, but I must have overlooked it, probably because the 50mm doublet from the same listing is coated for visible light. This will come up to bite me later.
After setting up the design in optiland, we can start asking some questions:
What is the optimal distance between the two doublets?#
The idea here is that for each candidate distance, we:
- focus the lens by by shifting the image plane ever so slightly until the spot at the 550nm wavelength and middle of the image is minimal.
- record the spot size off-axis (at 10mm from the center) at all three wavelengths (450nm, 550nm, 650nm).
Plotting the results gives:
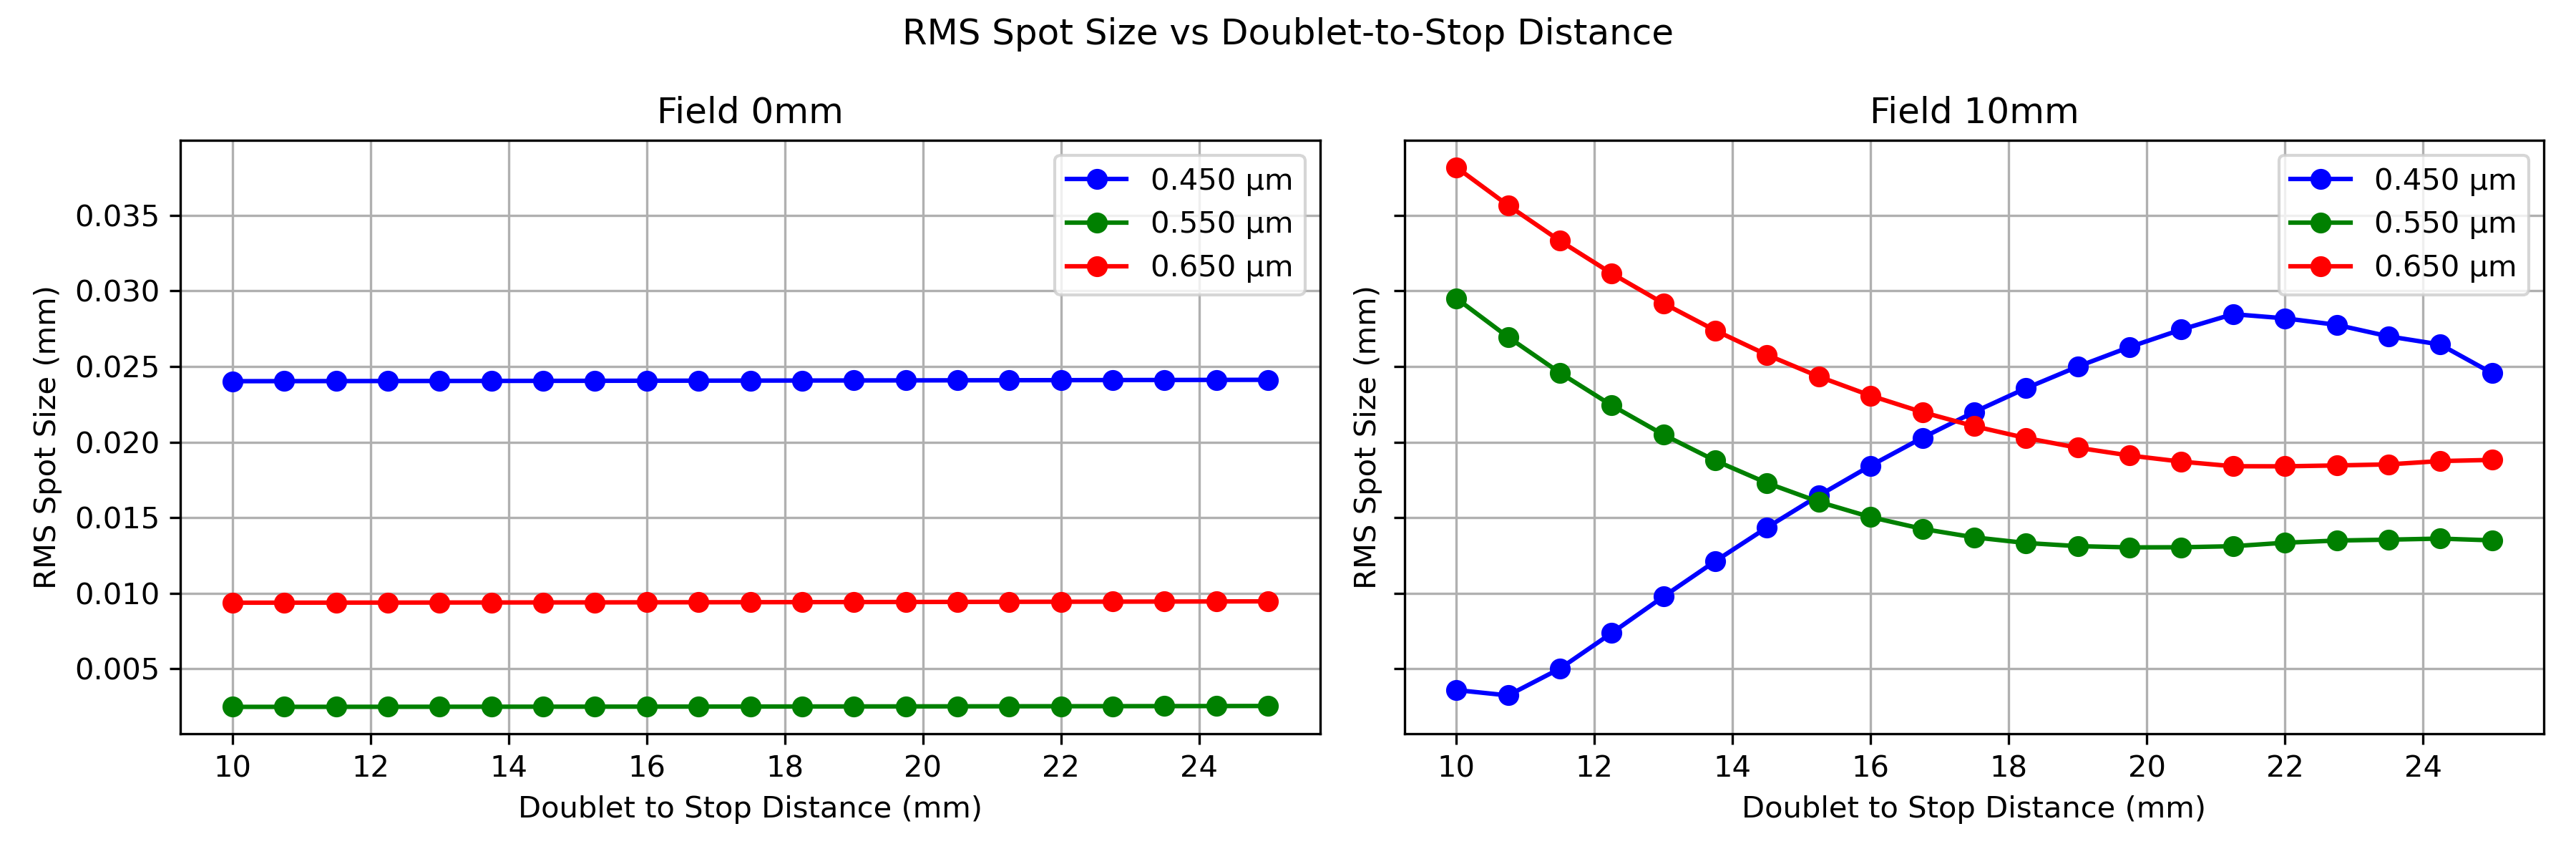
It is pretty clear that there are no winners here. The center is always going to exhibit identical chromatic aberration and the off-axis spot size seems to be a tradeoff between the individual wavelengths. In the end, I picked 15mm, but possibly going higher would have been better in keeping the wavelengths "identically aberrated".
I expect that adding a positive element from any "normal" optical glass would help to correct the chromatic aberration (remember that index of refraction grows with decreasing wavelength, so any positive element is going to focus blue light closer than the other wavelengths). I decided to leave that for a future iteration.
What is the depth of field at f/8?#
Luckily, optiland can compute the appropriate physical aperture stop size for a given f-number. Setting it to f/8 gives a stop diameter of about 3.8mm given our geometry. Next, we plot the heatmap of spot sizes (at 550nm) at different object distances from the front element and from the optical axis:
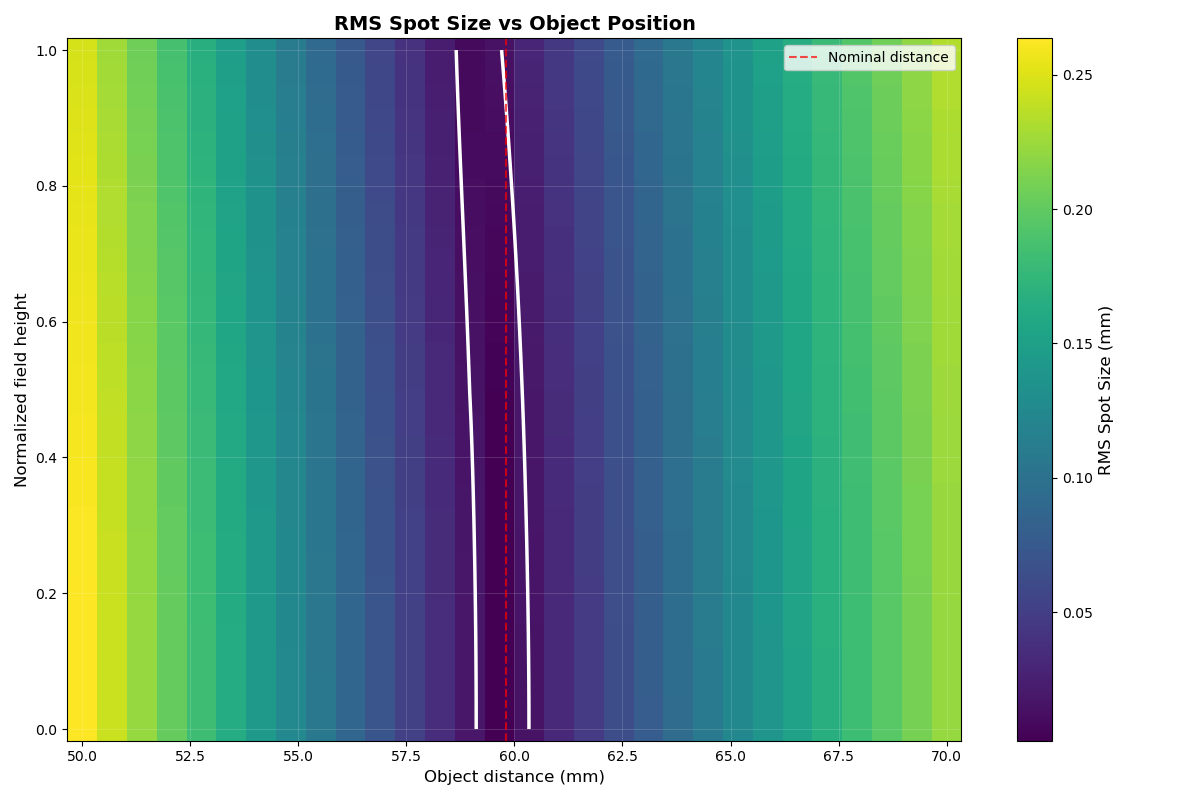
The white lines determine the region where the spot size is below the conventional 0.015mm circle of confusion for a micro four thirds sensor. Unsurprisingly, the depth of field is pretty shallow at around 1mm. The Petzval field curvature is also visible here, but in practice it has turned out that other aberrations dominate at f/8 and the field curvature is barely noticeable.
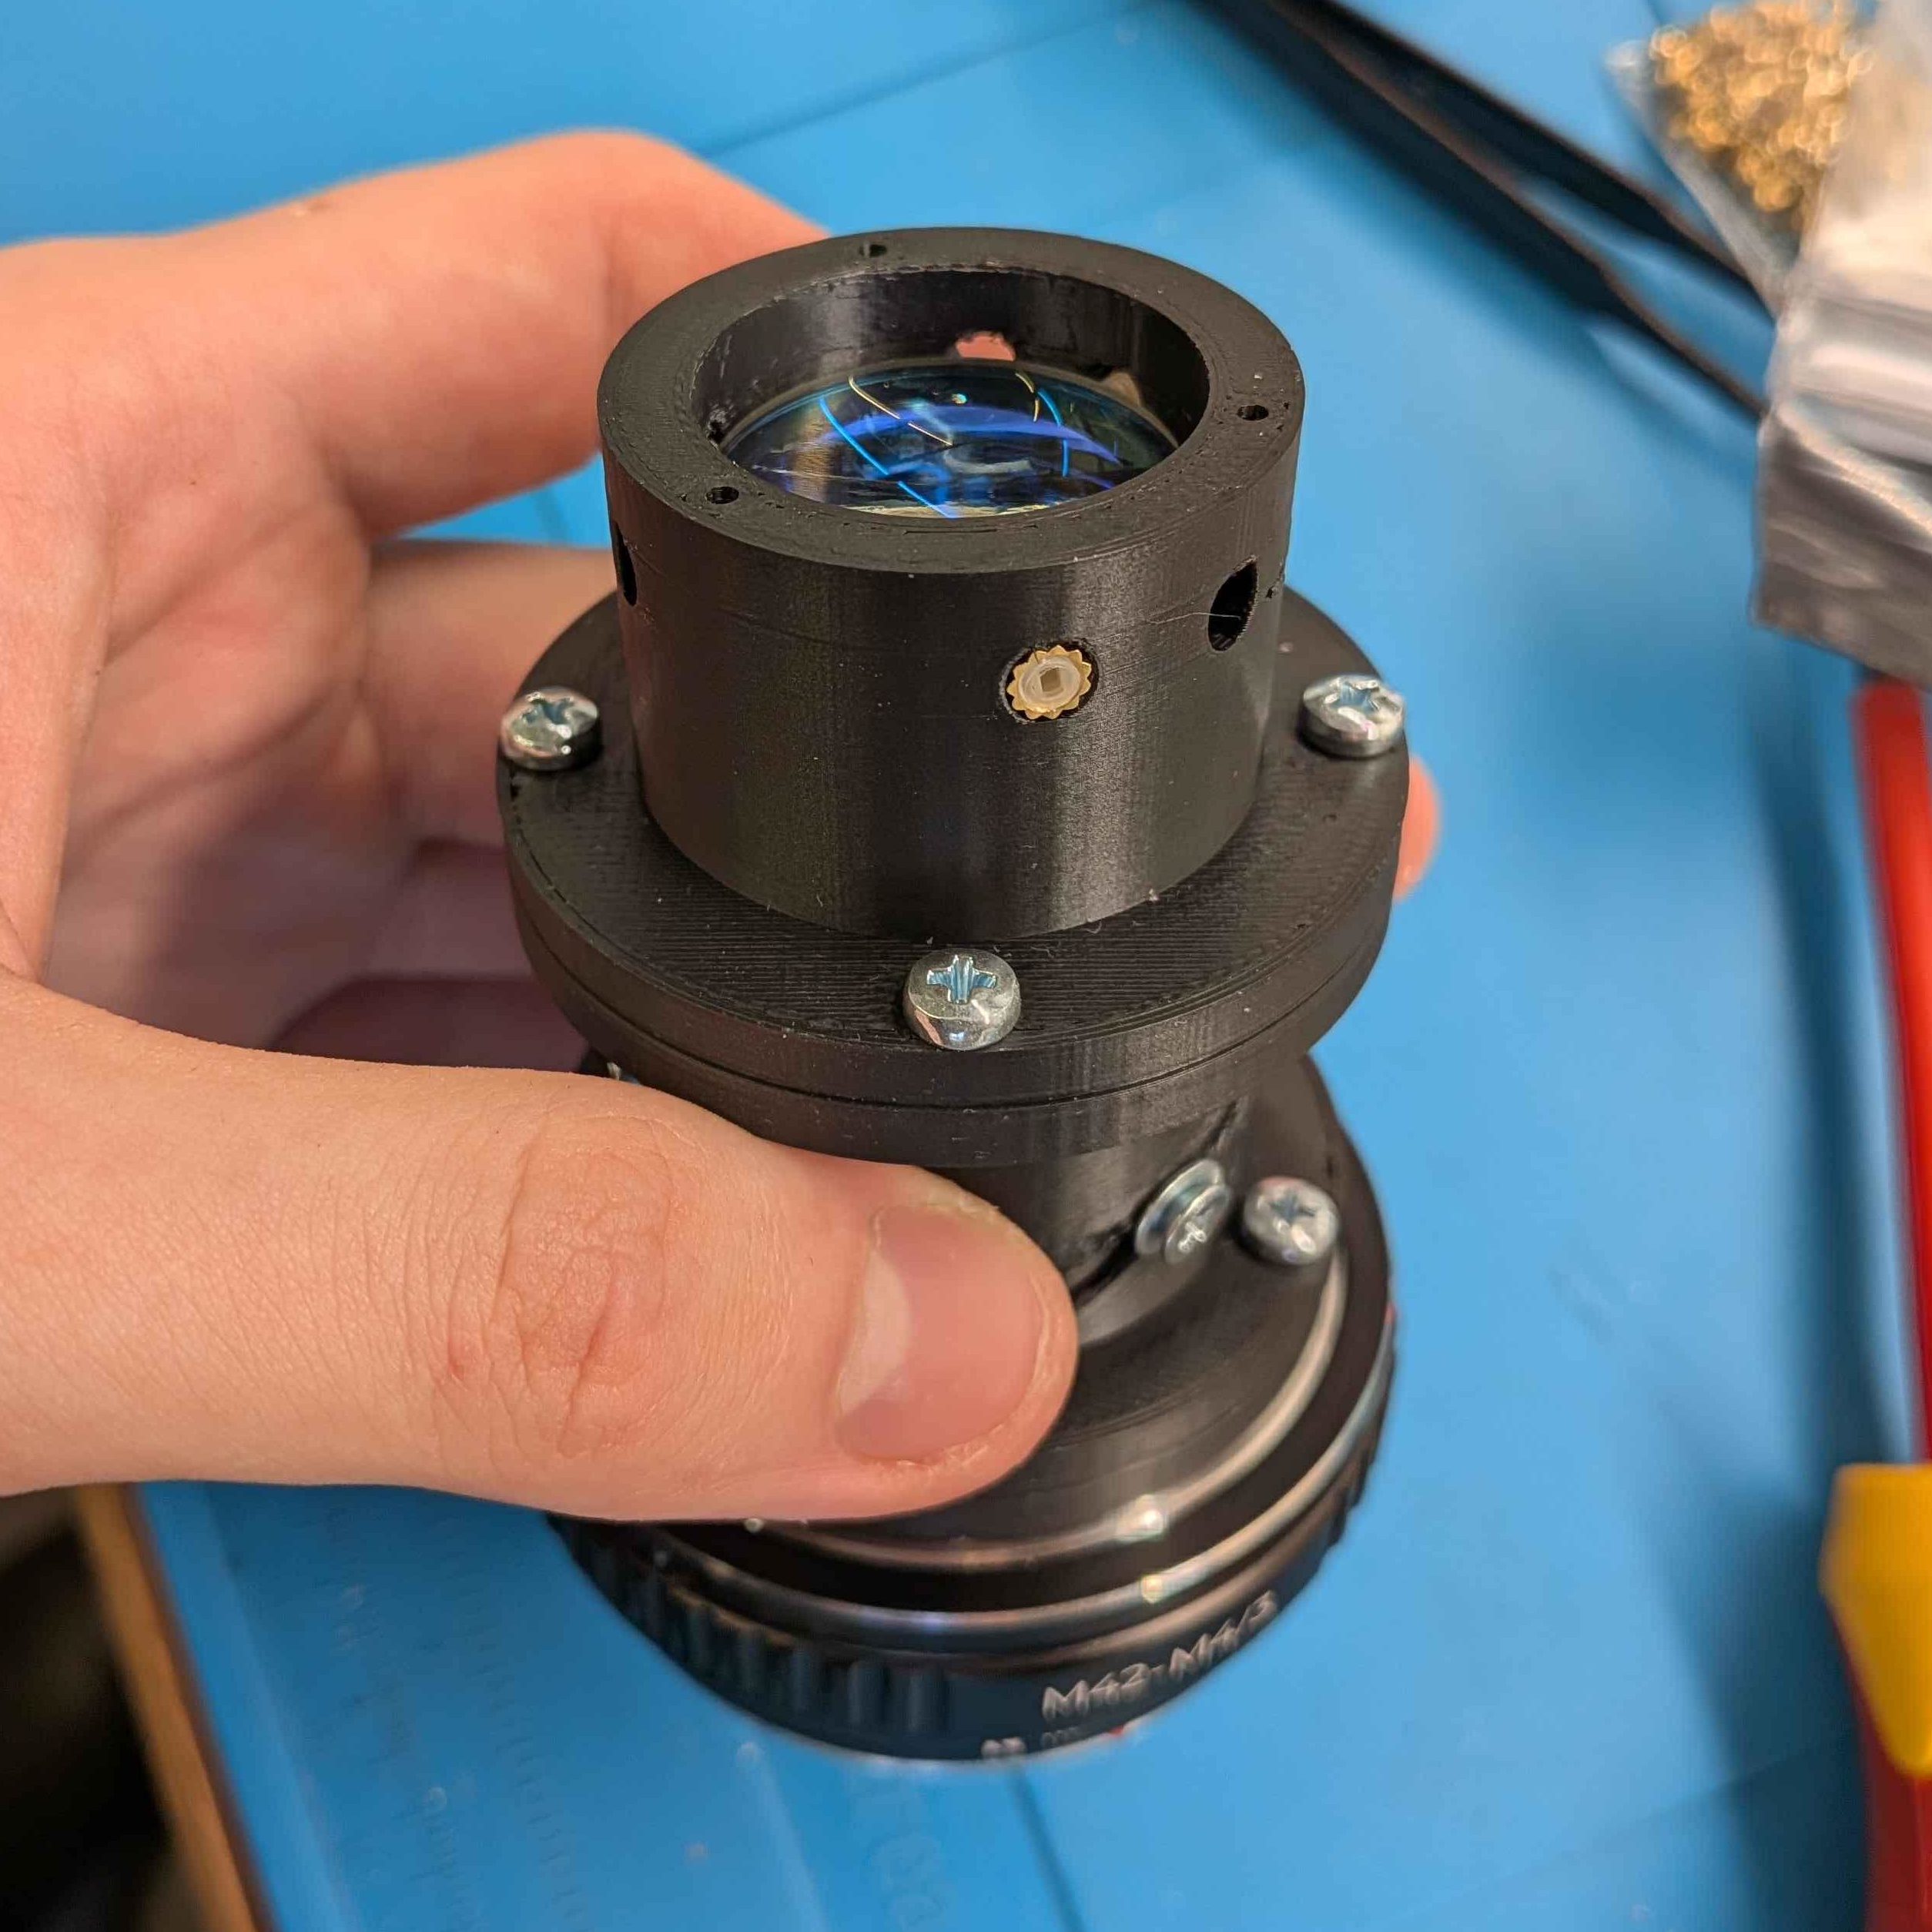
The first prototype#
I modeled the lens as a multi-part 3D print in OpenSCAD. The design essentially consists of:
- a tube holding the front doublet. This includes the aperture stop
- a tube holding the rear doublet, which is essentially identical to the front one except it does not have the aperture stop
- a "focusing tube", which was an attempt at a helical focusing mechanism
- an adapter to M42 thread
There is also a pair of "retaining rings" which do not really retain the lenses (that is accomplished by nylon grub screws), but in case those get loose, I wanted to have something preventing the lenses from falling out, especially in the sensor direction.
Right after assembling, I realized that the focusing tube design is next to useless, as it does not provide smooth operation and it does not even hold the rest of the lens coaxial unless tightened. I also realized that unless the focusing tube is very good, there is basically no point in having it at all, since moving the camera is much easier and comfortable in practice.
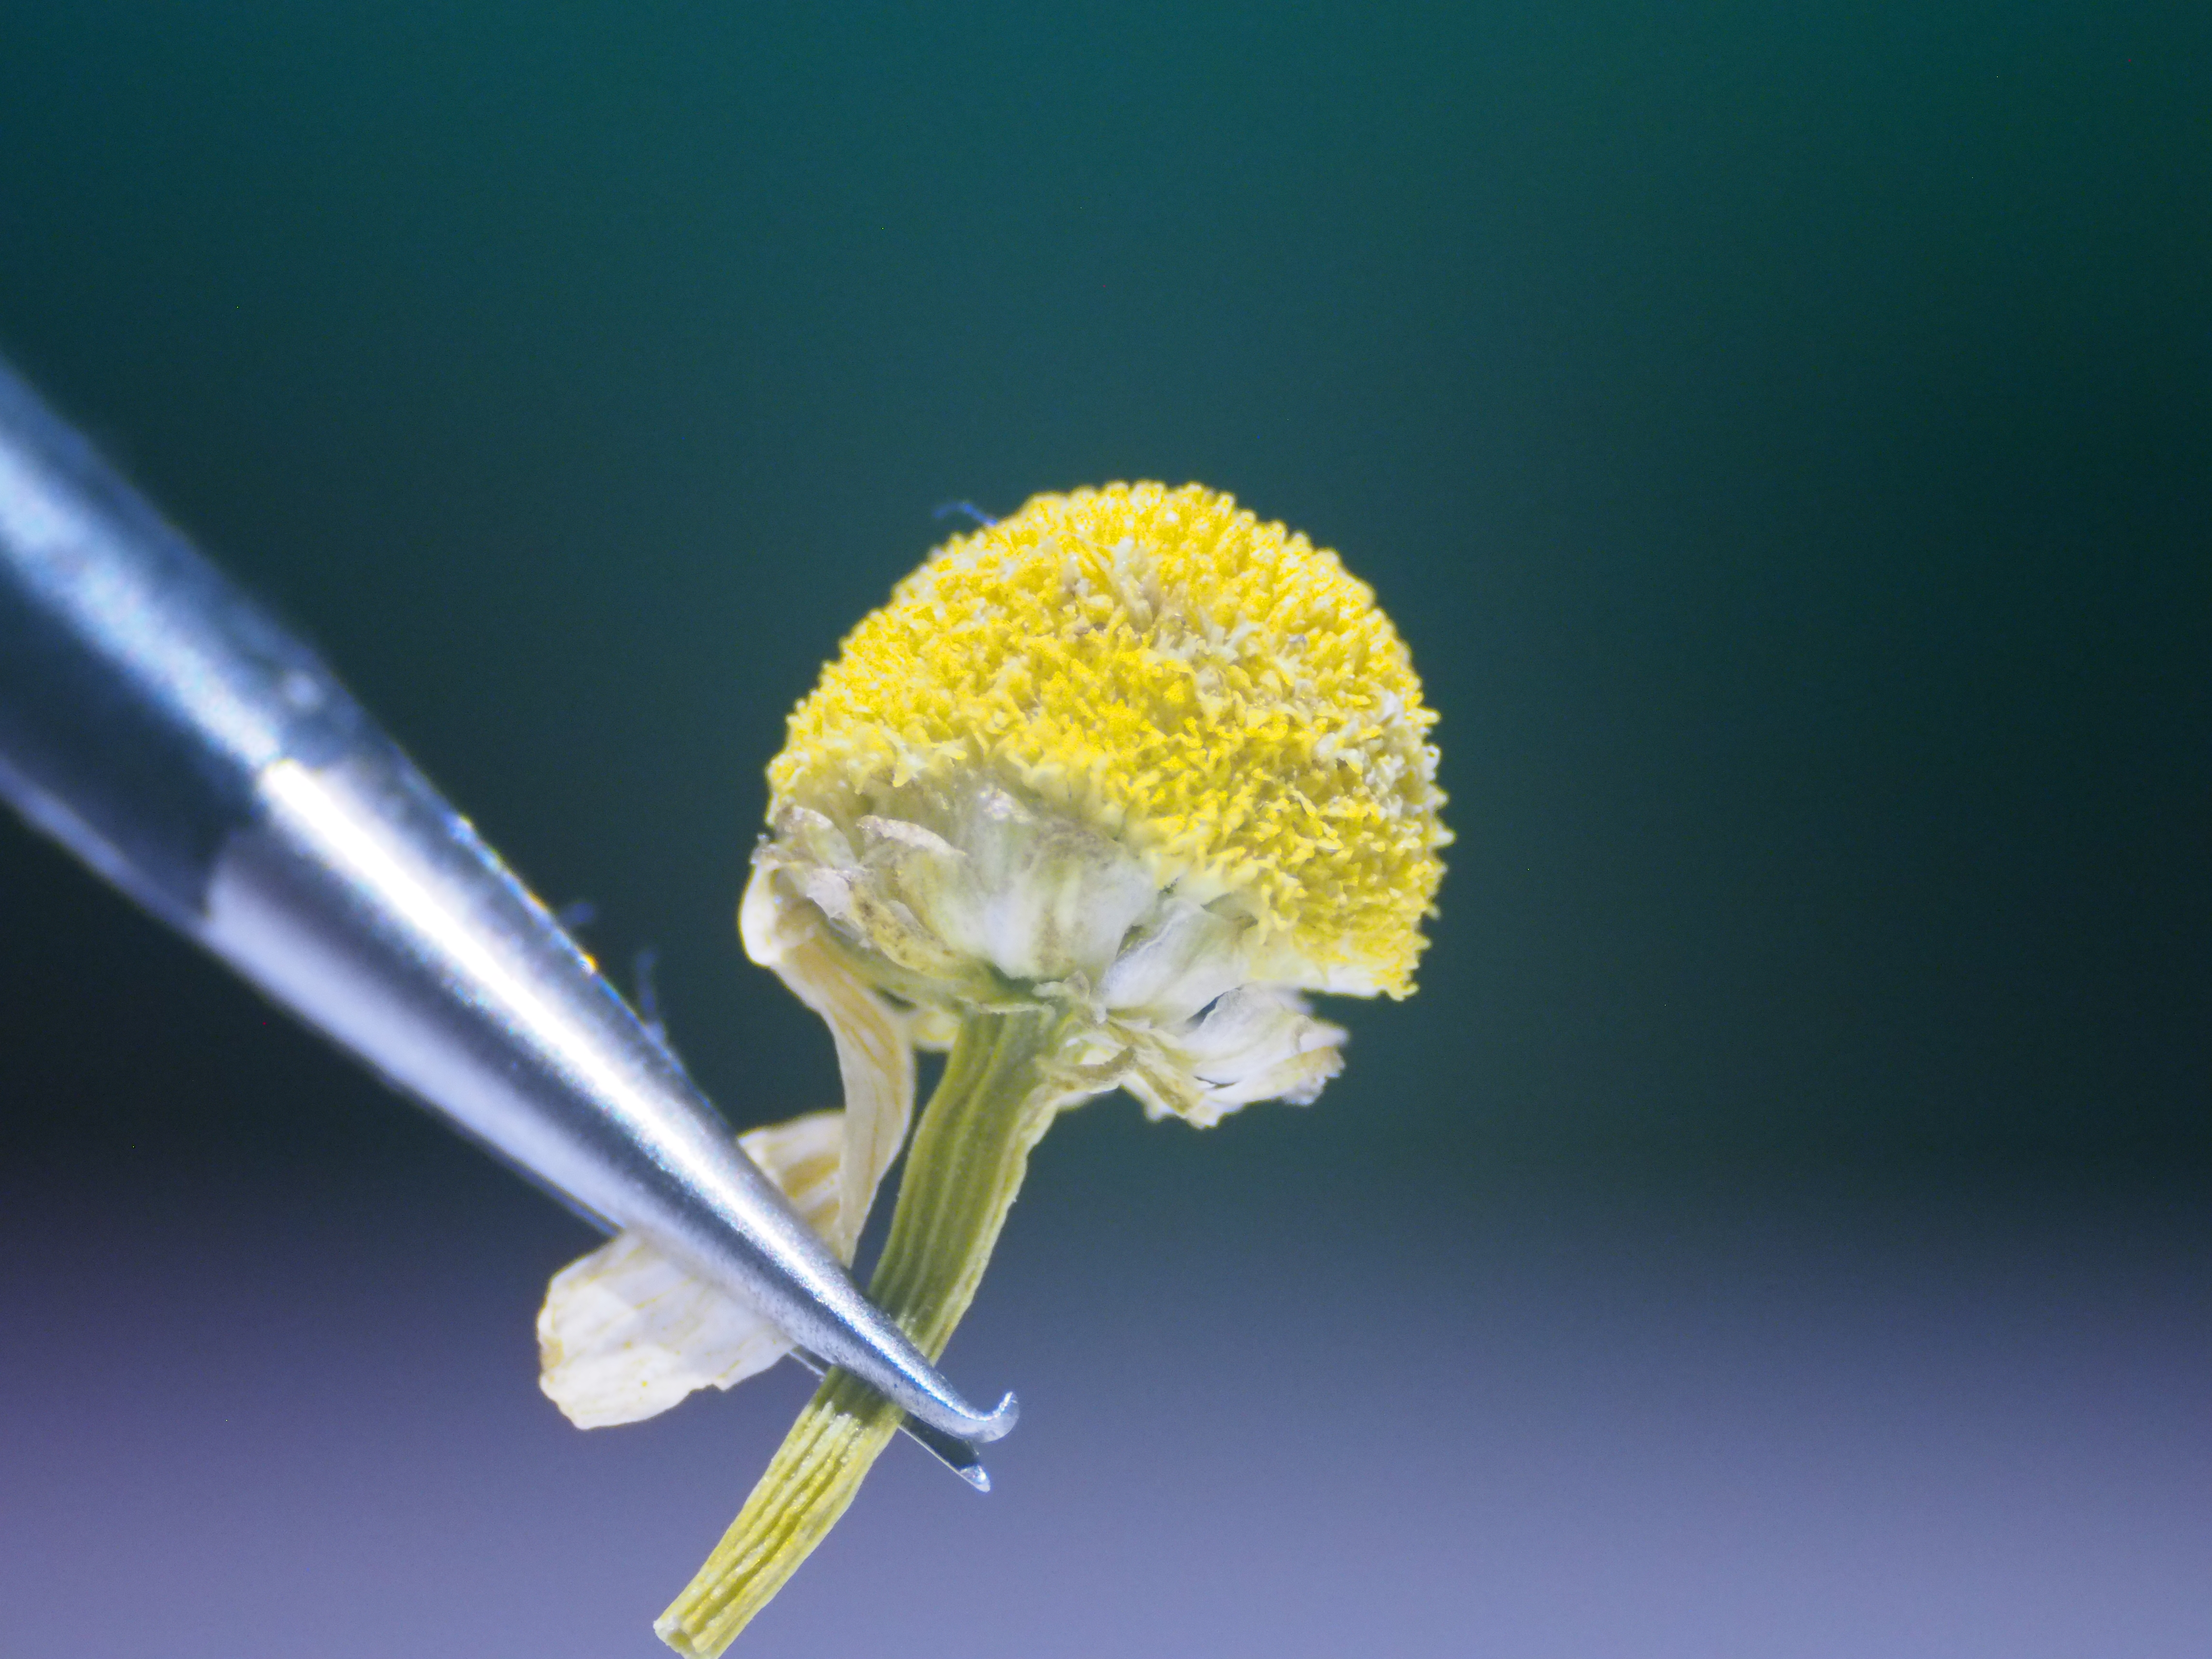
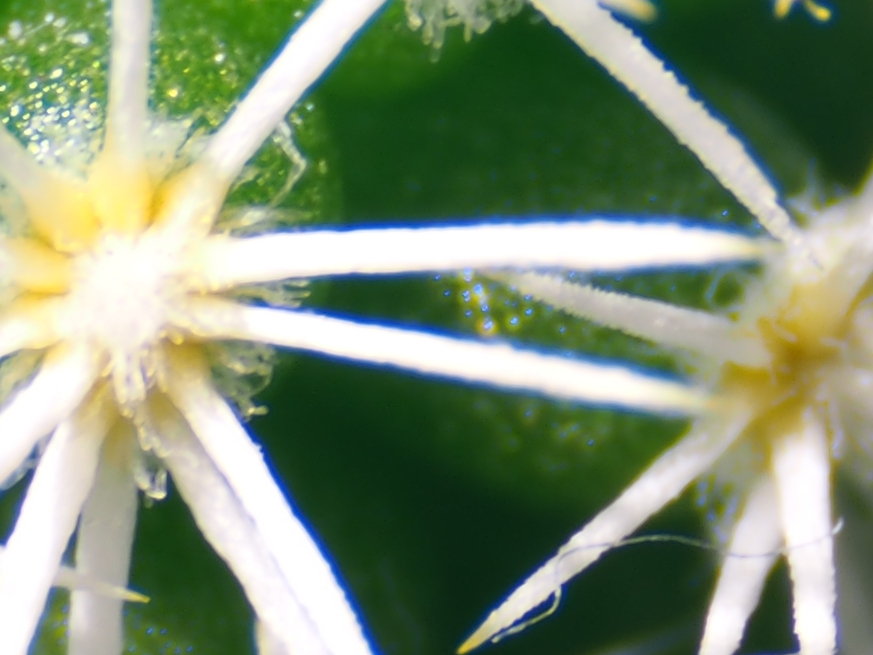
One of the first things I noticed was that the automatic white balance of the camera just straight up fails to work. Playing with a flashlight, I noticed pretty severe lens flare. The photos also seemed to be weirdly lacking contrast.
For example, in the following photo of a dried chamomile flower (illuminated by a flashlight), the green-tinted background is not an external feature, but rather a result of a combination of lens flare, internal reflections and light leakage (I found the nylon grub screws holding the rear element to be particularly sensitive, it is necessary to either tape them or use black hot glue).
Baffled by light baffles#
To combat the general low contrast issues, I decided to implement several countermeasures:
- elongate the "retaining ring", making it into what is effectively a lens hood
- eliminate the focusing tube entirely, meaning no light is going to leak through the helical slots
- tape over the nylon grub screws holding both the front and rear elements
- implement internal light baffles in the front lens holder part
- paint the interior with matte black acrylic paint
- use the "fuzzy skin" feature of PrusaSlicer
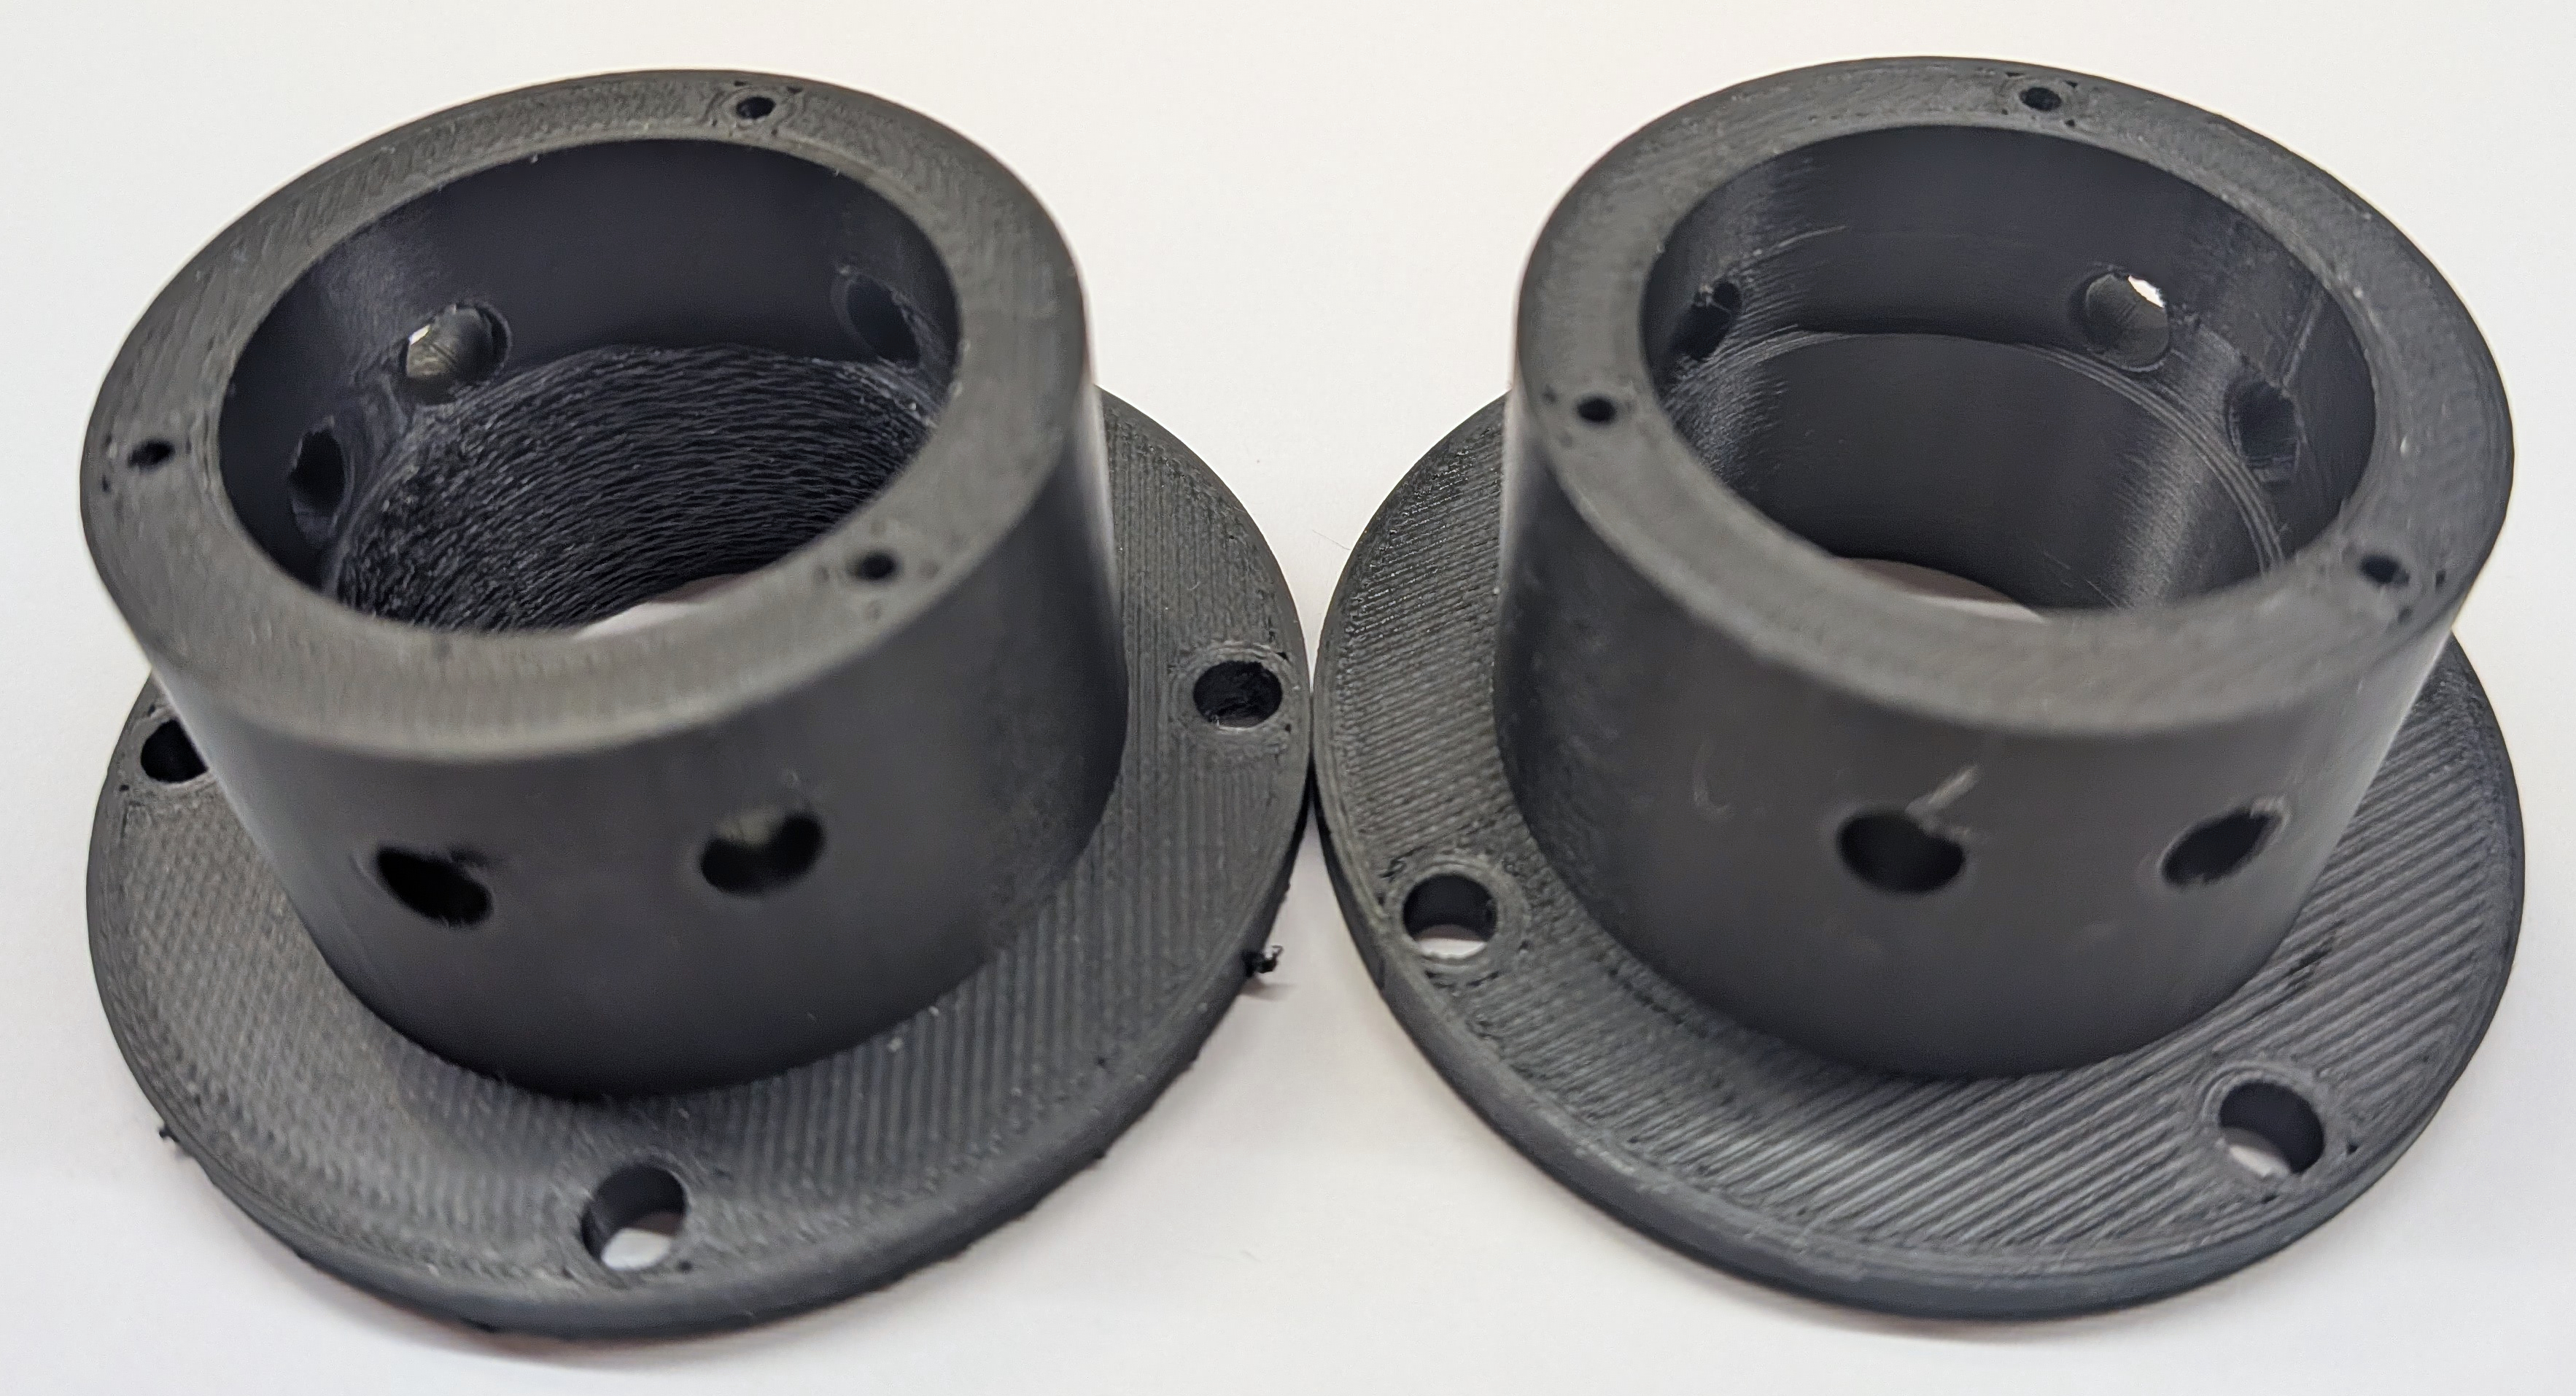
Side by side of a fuzzy skin print and a normal print.
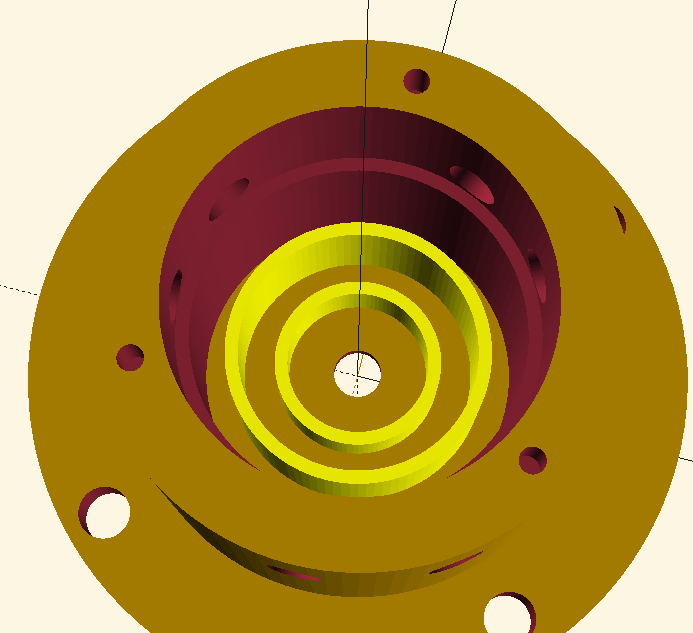
The light baffles are particularly interesting concept. Note that usually, they are placed on the barrel walls, but since I am 3D printing the aperture stop, it is more convenient to place them vertically on the aperture stop itself.
Geometrically, the idea is to make the light baffles exactly the right height so that they block any light rays that would otherwise enter the lens, hit a wall and then reflect into the aperture opening. This is illustrated by the following diagram:
And in practice, my implementation looks like this:
For the black paint, I used the "Vallejo Model Color 70950". I do not recommend it, it is still fairly glossy (better than Prusament matte PETG, but not vanta black...). Better options are available on the market, but those cannot be sourced from a local hobby store.
The second version ended up looking like this (before taping over the grub screws):
There was some improvement in contrast and flare, but it is still not fundamentally different from the first version. I have just resorted to manually white balancing on a sheet of paper and then doing final adjustment in post processing if needed.
Qualitative observations#
The color rendering is just... weird. It was at this moment that I started suspecting that some of the coatings are just not very spectrally neutral. This unfortunately makes automatic white balancing impossible and I have just resorted to carrying a white card around for manual white balancing.
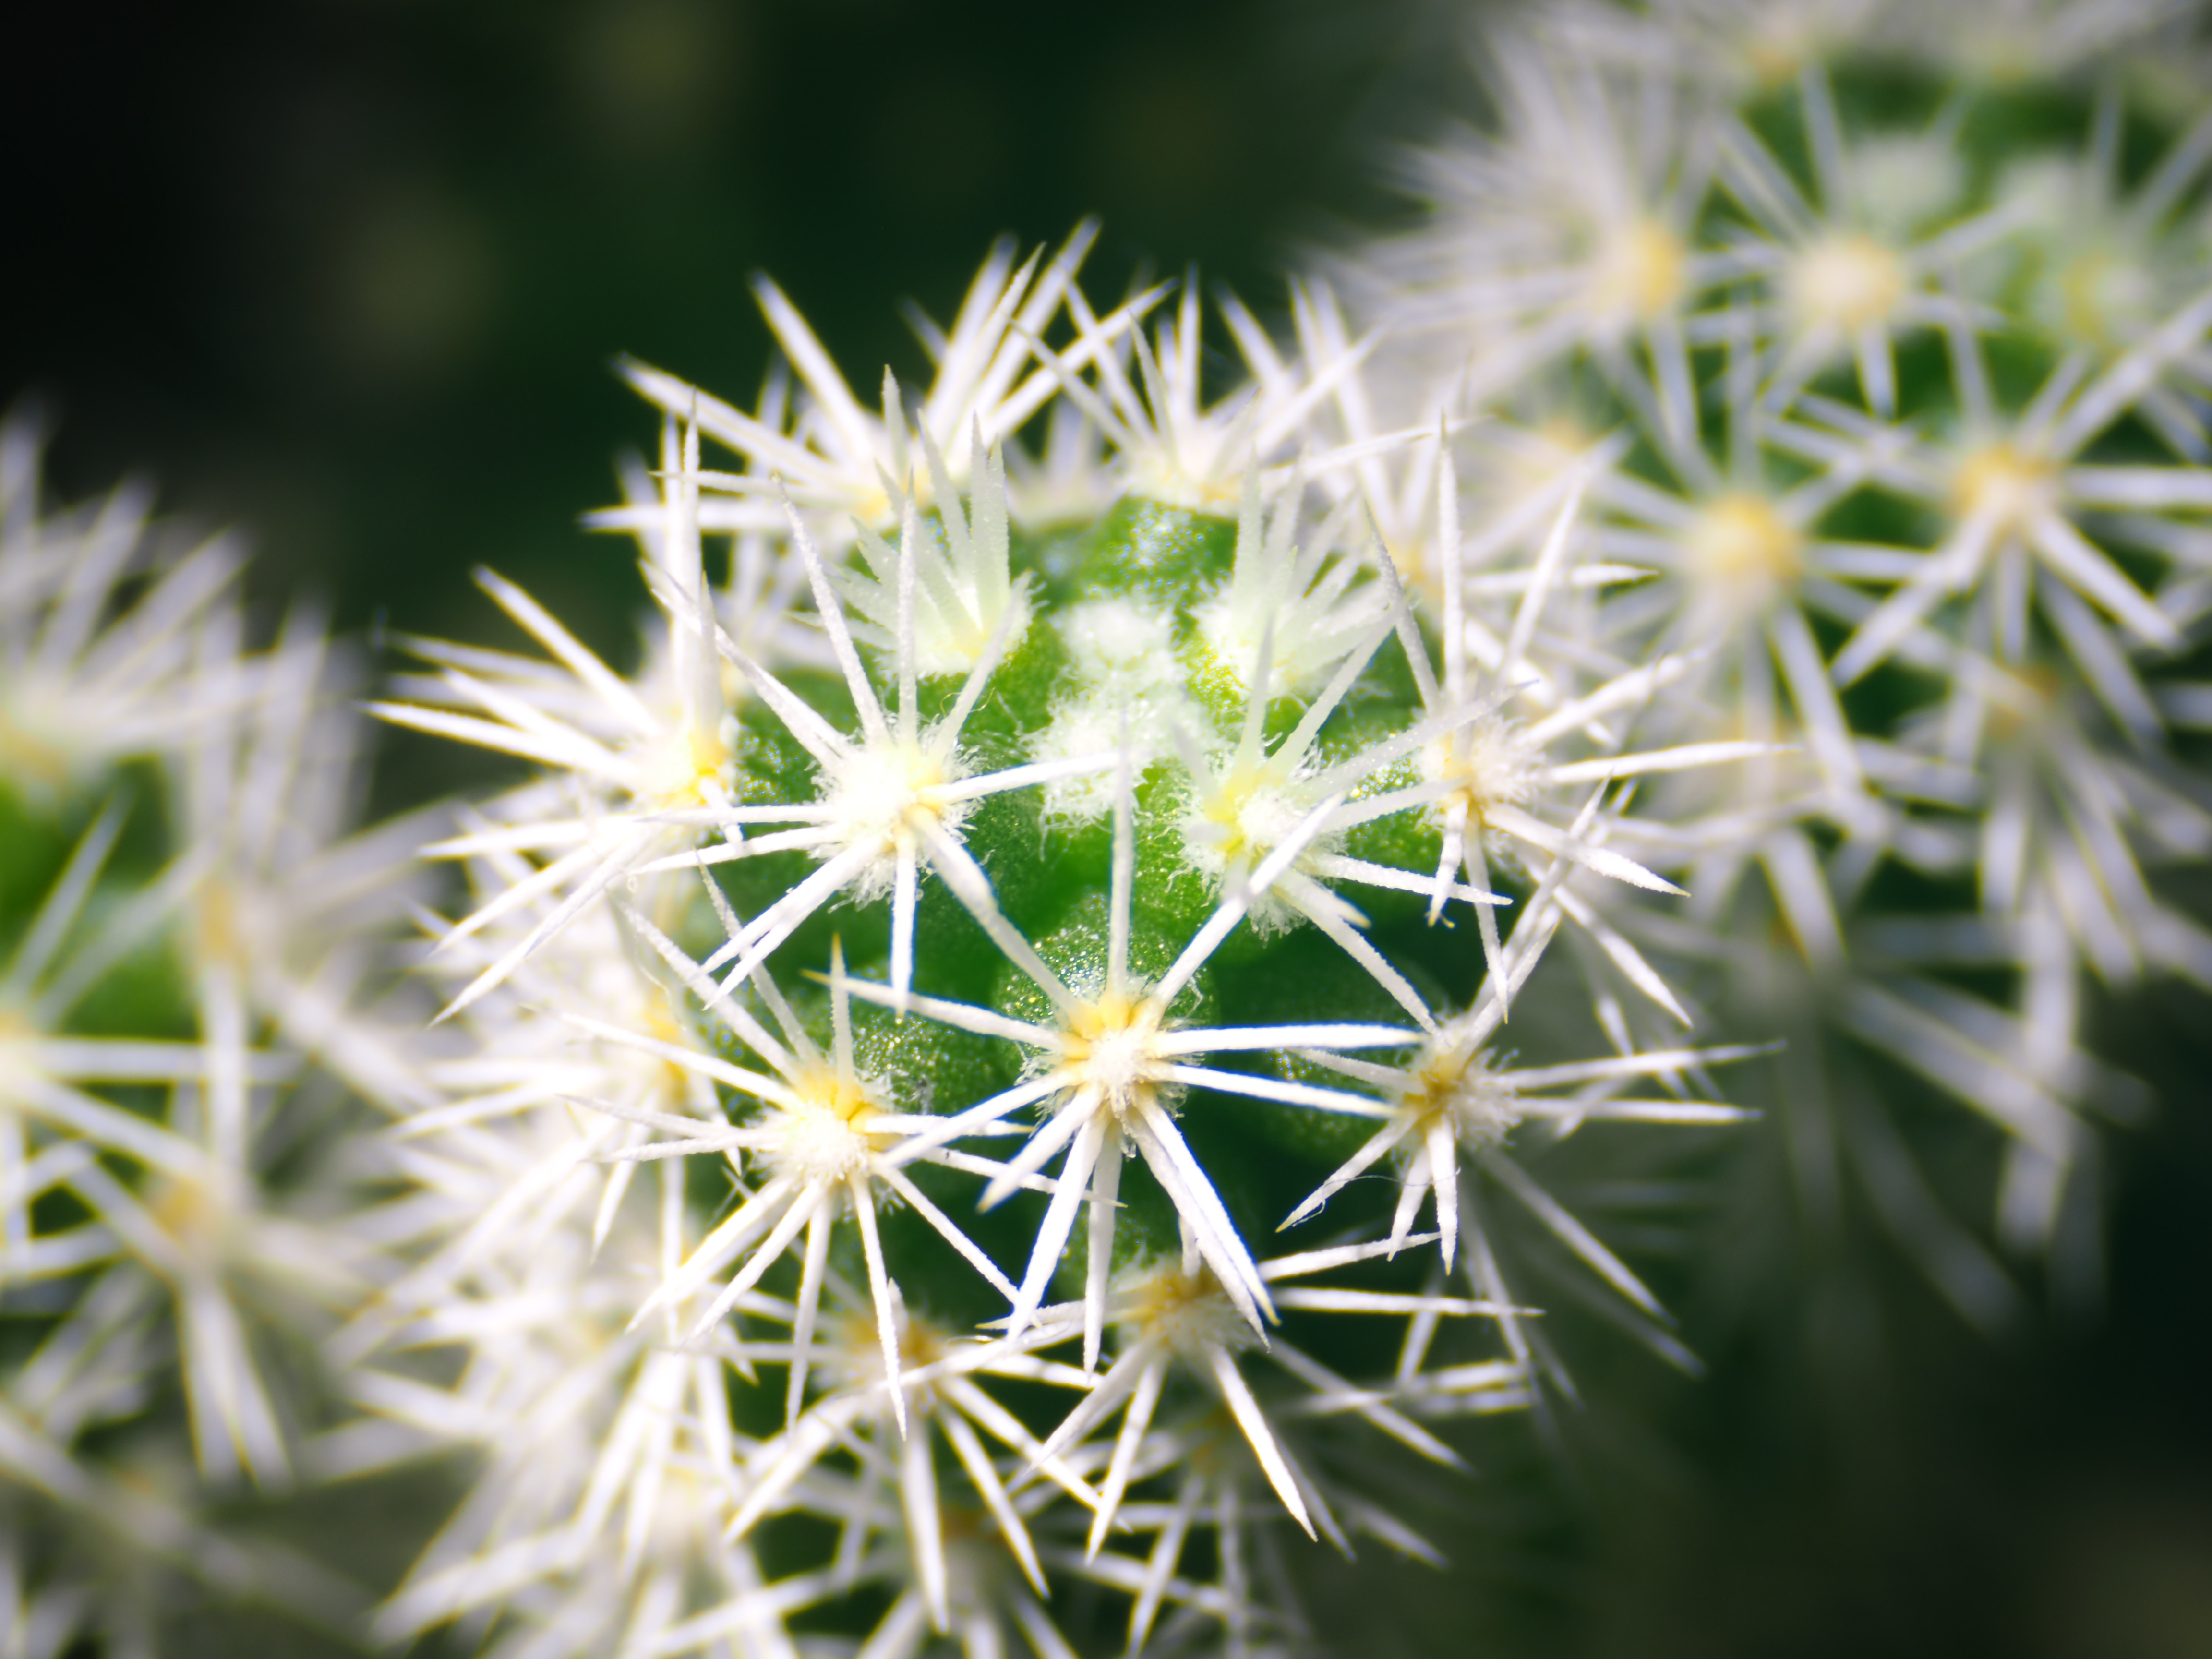
Other than that, the lens is surprisingly sharp considering its origin and construction. As far as I can tell, axial chromatic aberration dominates the image quality. For example, zooming in at the cactus photo from the start of the post:
However, as expected based on the symmetry of the design, there is no noticeable distortion and no lateral chromatic aberration nor coma.
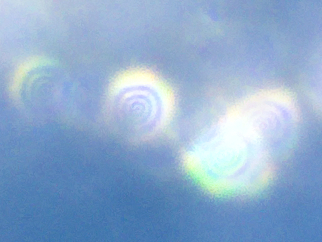
The bokeh balls show significant ringing in the blue channel, which is somewhat interesting and I am not quite sure what causes it.
The lens also feels much dimmer than f/8. I do not have any other macro lens and I know that synthetic lighting is generally used for macrophotography, so I do not know how much of this is just me expecting too much from natural light as opposed to actual losses in transmission.
Using the lens on a tripod is unfortunately quite difficult due to the lack of a focusing mechanism (and I do not own a macro rail).
Measurements#
To measure is to know.
Magnification#
This is relatively straightforward: set up a ruler in focus, then take a photo and count how many pixels correspond to a known length on the ruler. In theory, the lens should be distortion-free, so the magnification should be constant across the frame.
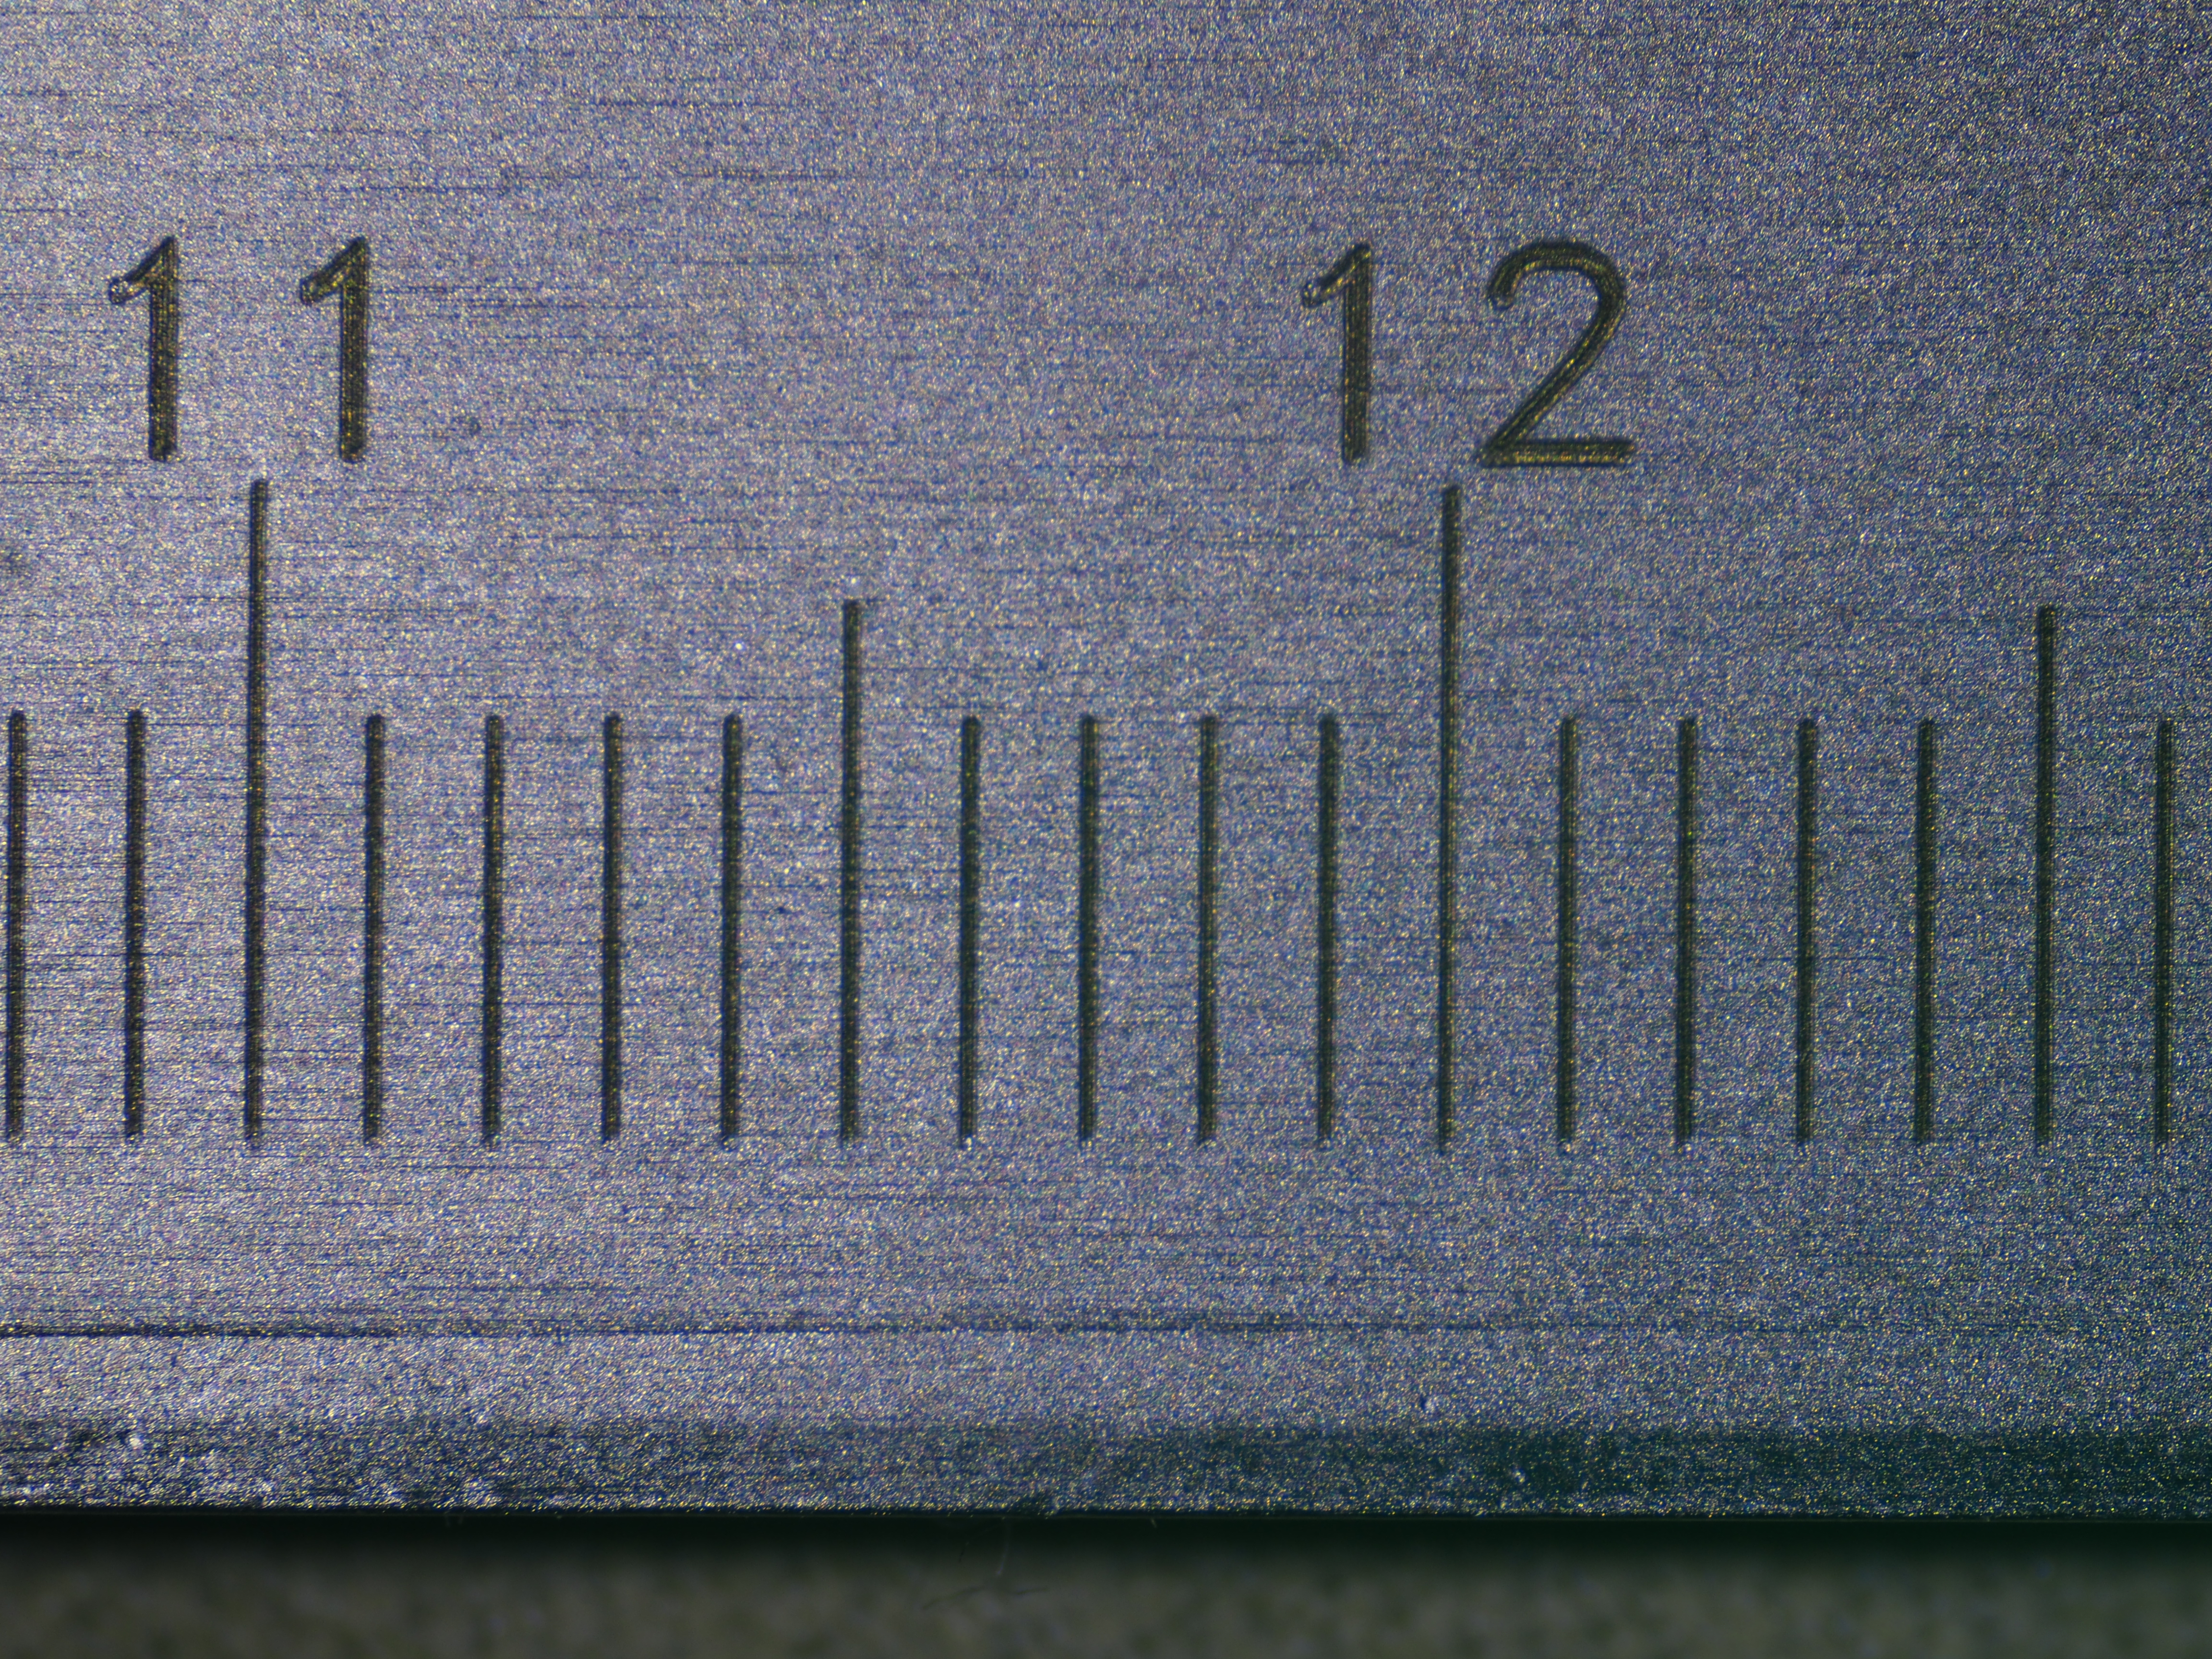
From the photo, I measured a pixel density of about 247px/mm. The camera sensor has a pixel density of about 266px/mm, meaning the resulting magnification is about 0.9x. This is mildly disappointing, but I must have miscalculated the distance from the rear element to the sensor. The first prototype ended up being at about 0.99x, so I probably moved the sensor slightly too close when removing the focusing tube.
Color balance#
I have already observed that the color rendering is wacky. To quantify this, I photographed a sheet of white paper under daylight with my lens and two commercial lenses and then compared the mean raw pixel values, normalizing to the green channel.
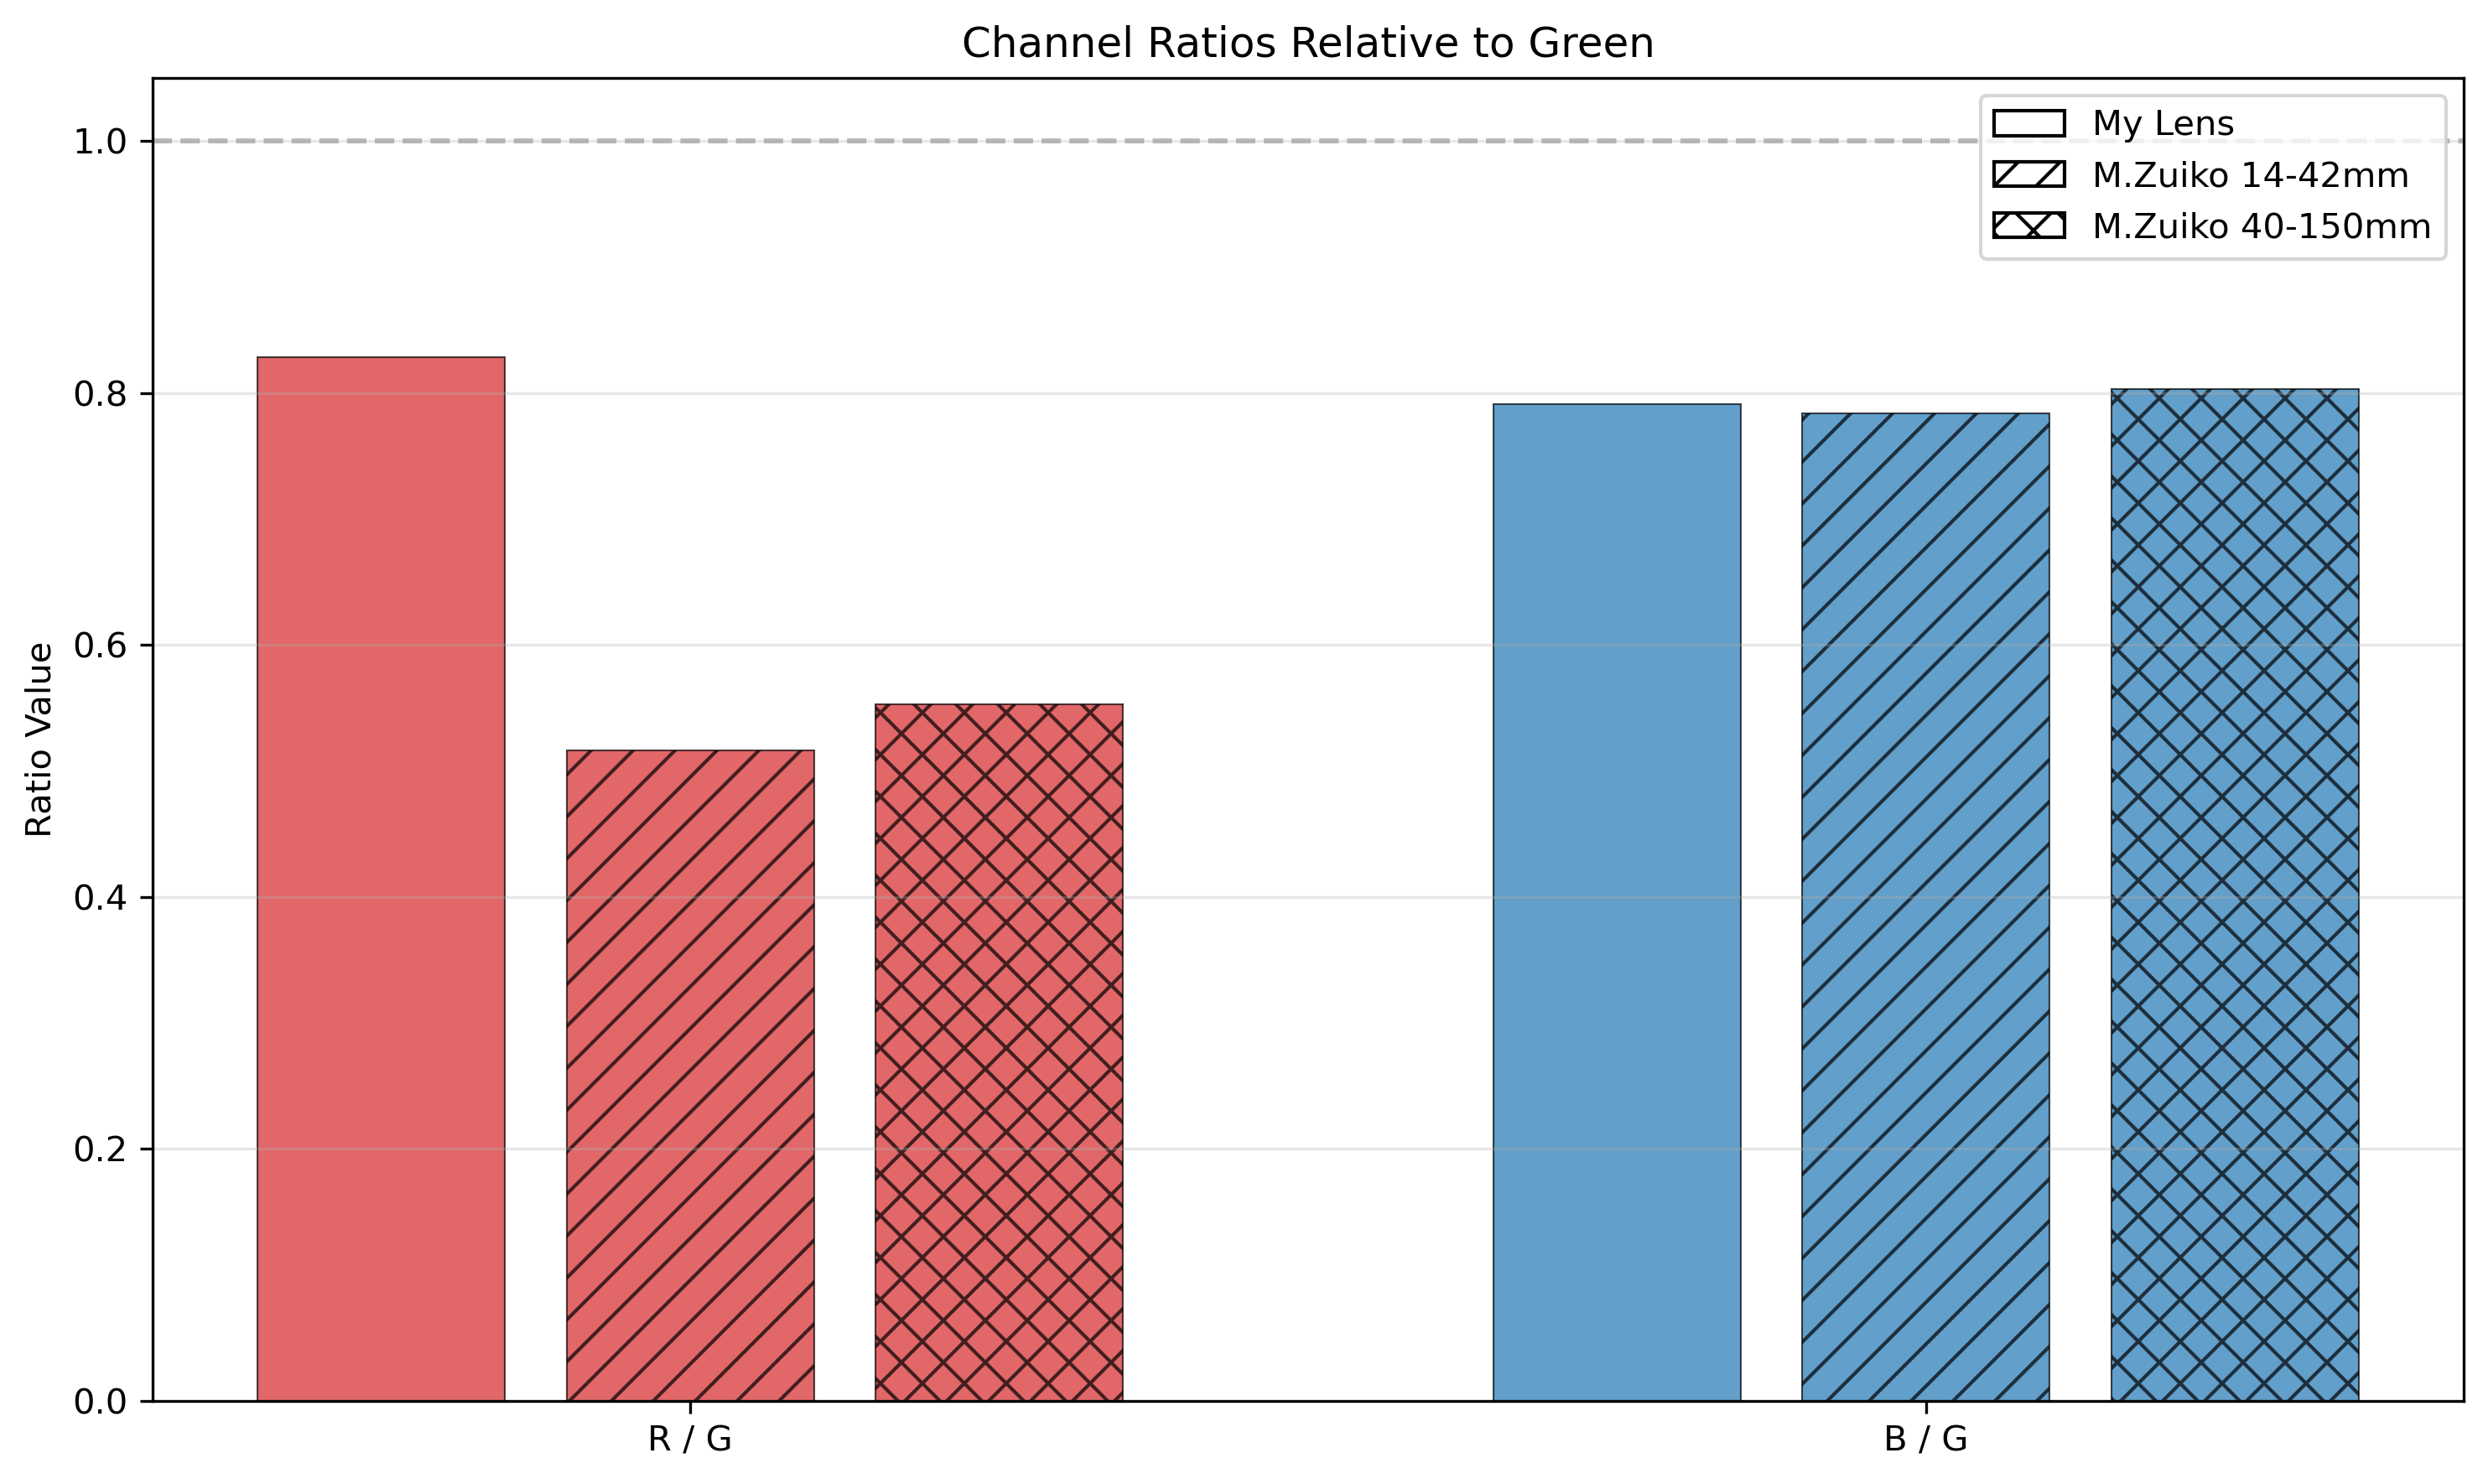
The results show significantly more red channel for my lens compared to the other two commercial lenses. This should not have been too surprising, if I read the fine print of the datasheet correctly, as the doublets have anti-reflective coatings optimized for 650-1050nm! This explains why the AWB of the camera fails so hard.
This may also somewhat explains the dimness of the lens. Even the brand name ThorLabs lens has a sharp tranmissivity drop above 650nm and I do not expect the AliExpress clone to be any better.
Closing thoughts#
Overall, I am fairly happy with the results. The lens does take pictures of some sort, which is more than I could have hoped given that those are random lenses from AliExpress. Unfortunately, it did trigger a bit of a Gear Acquisition Syndrome, as now I want to buy an actual proper commercial macro lens.
The next step iteration would probably be redesigning the lens to use actual visible light doublets, adding an actual aperture diaphragm and possibly adding additional elements for more correction.
The OpenSCAD sources and optiland simulations are available on GitHub for those that are interested.
Picture dump#
You can click on the images to get to the full resolution versions. Most of these were taken with either natural light or a flashlight. All were handheld with IBIS enabled on an E-M10ii camera.
Unless noted otherwise, those are unedited JPEGs straight from the camera.
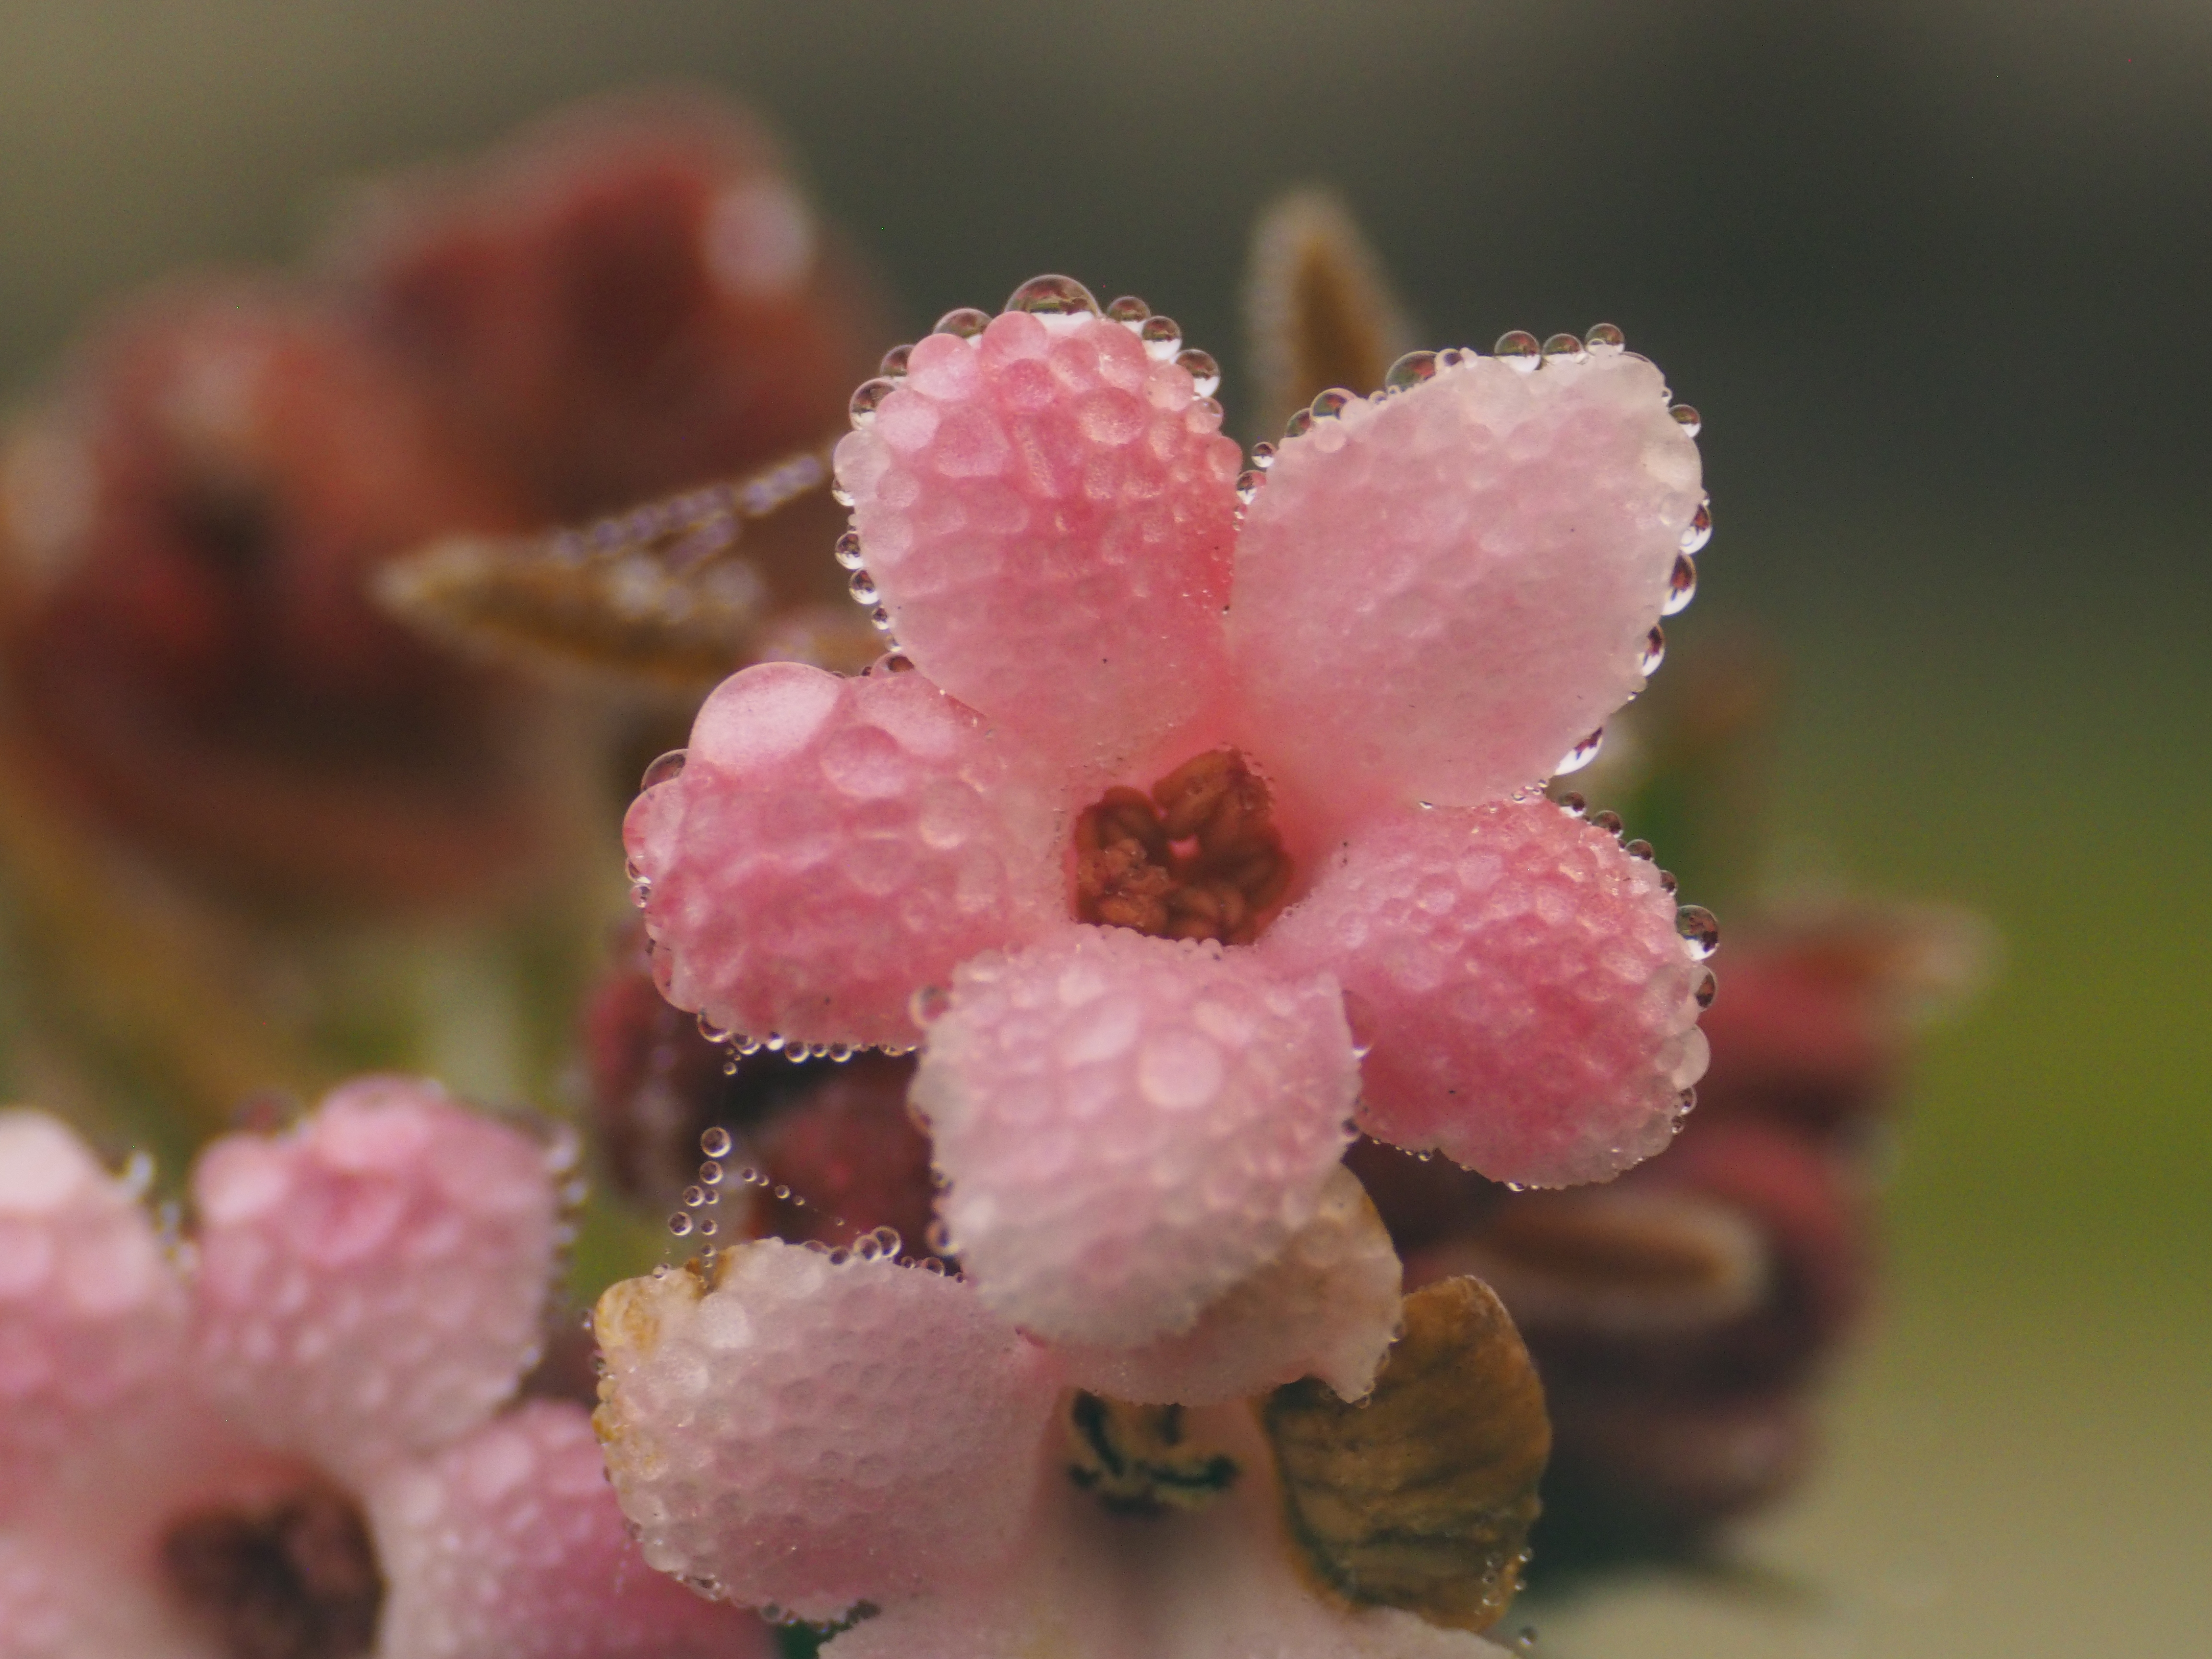
A pink flower with water droplets, 1/60, ISO 2000
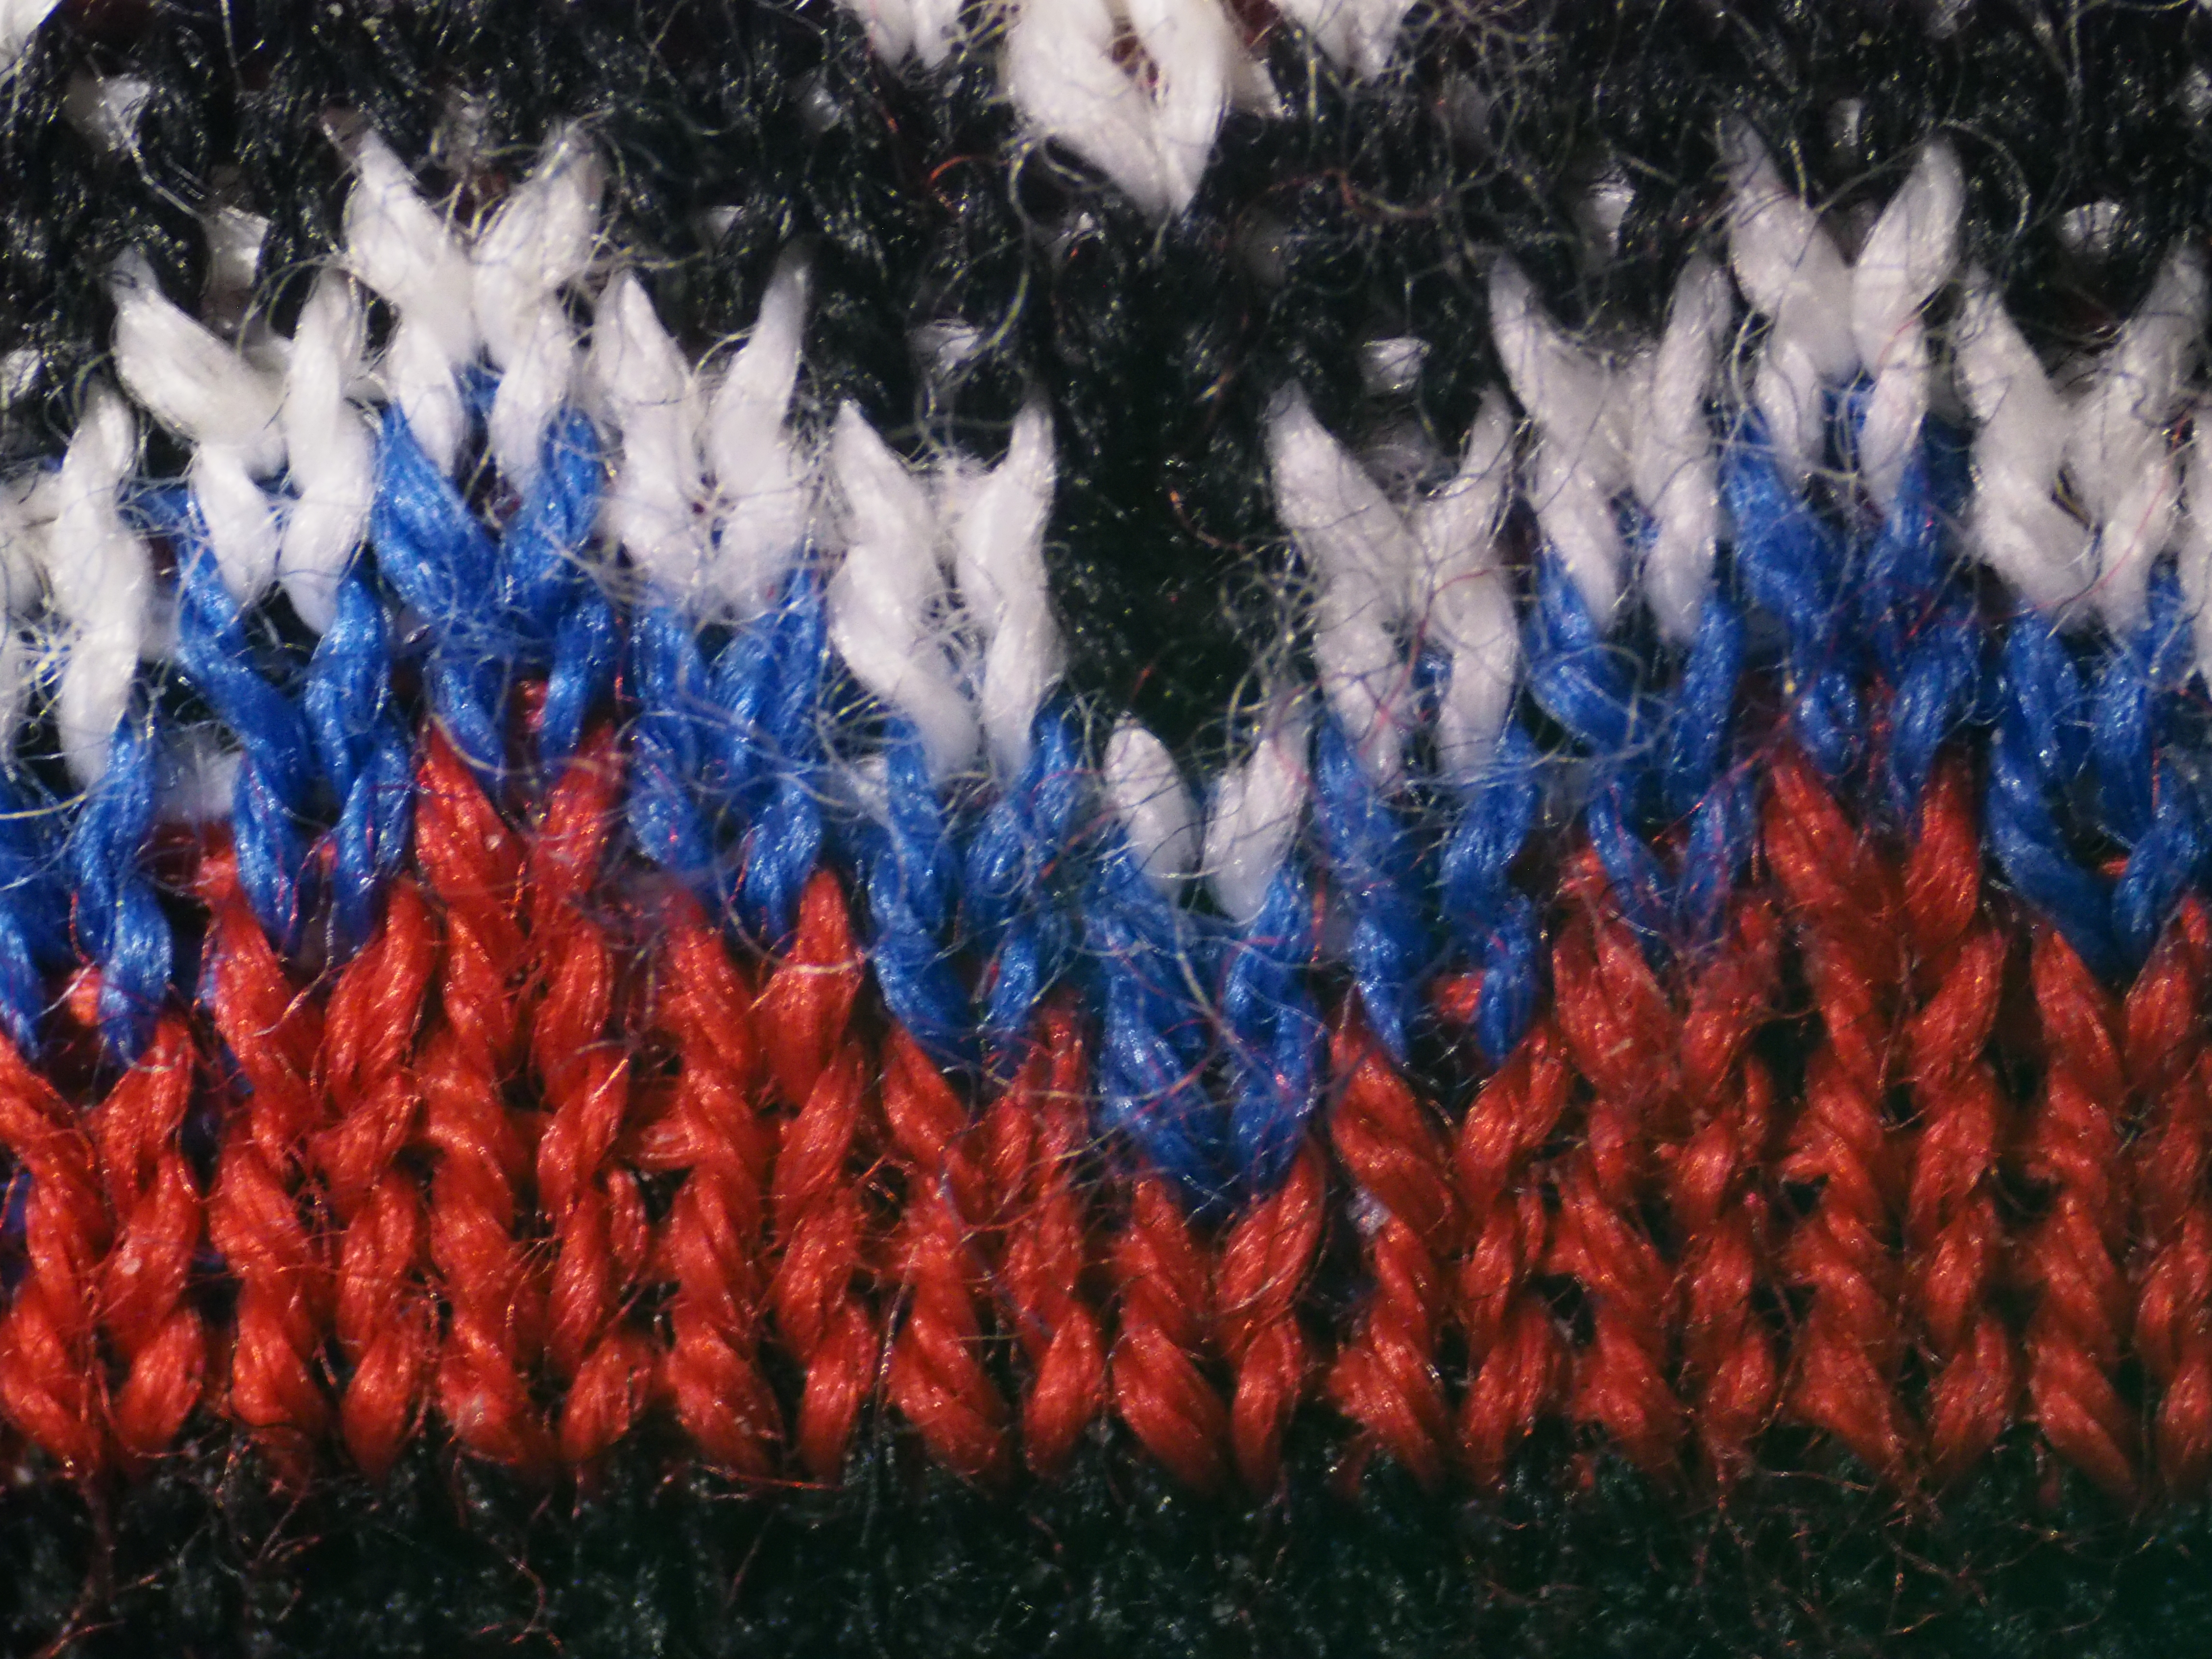
Merino hat, 1/60, ISO 5000
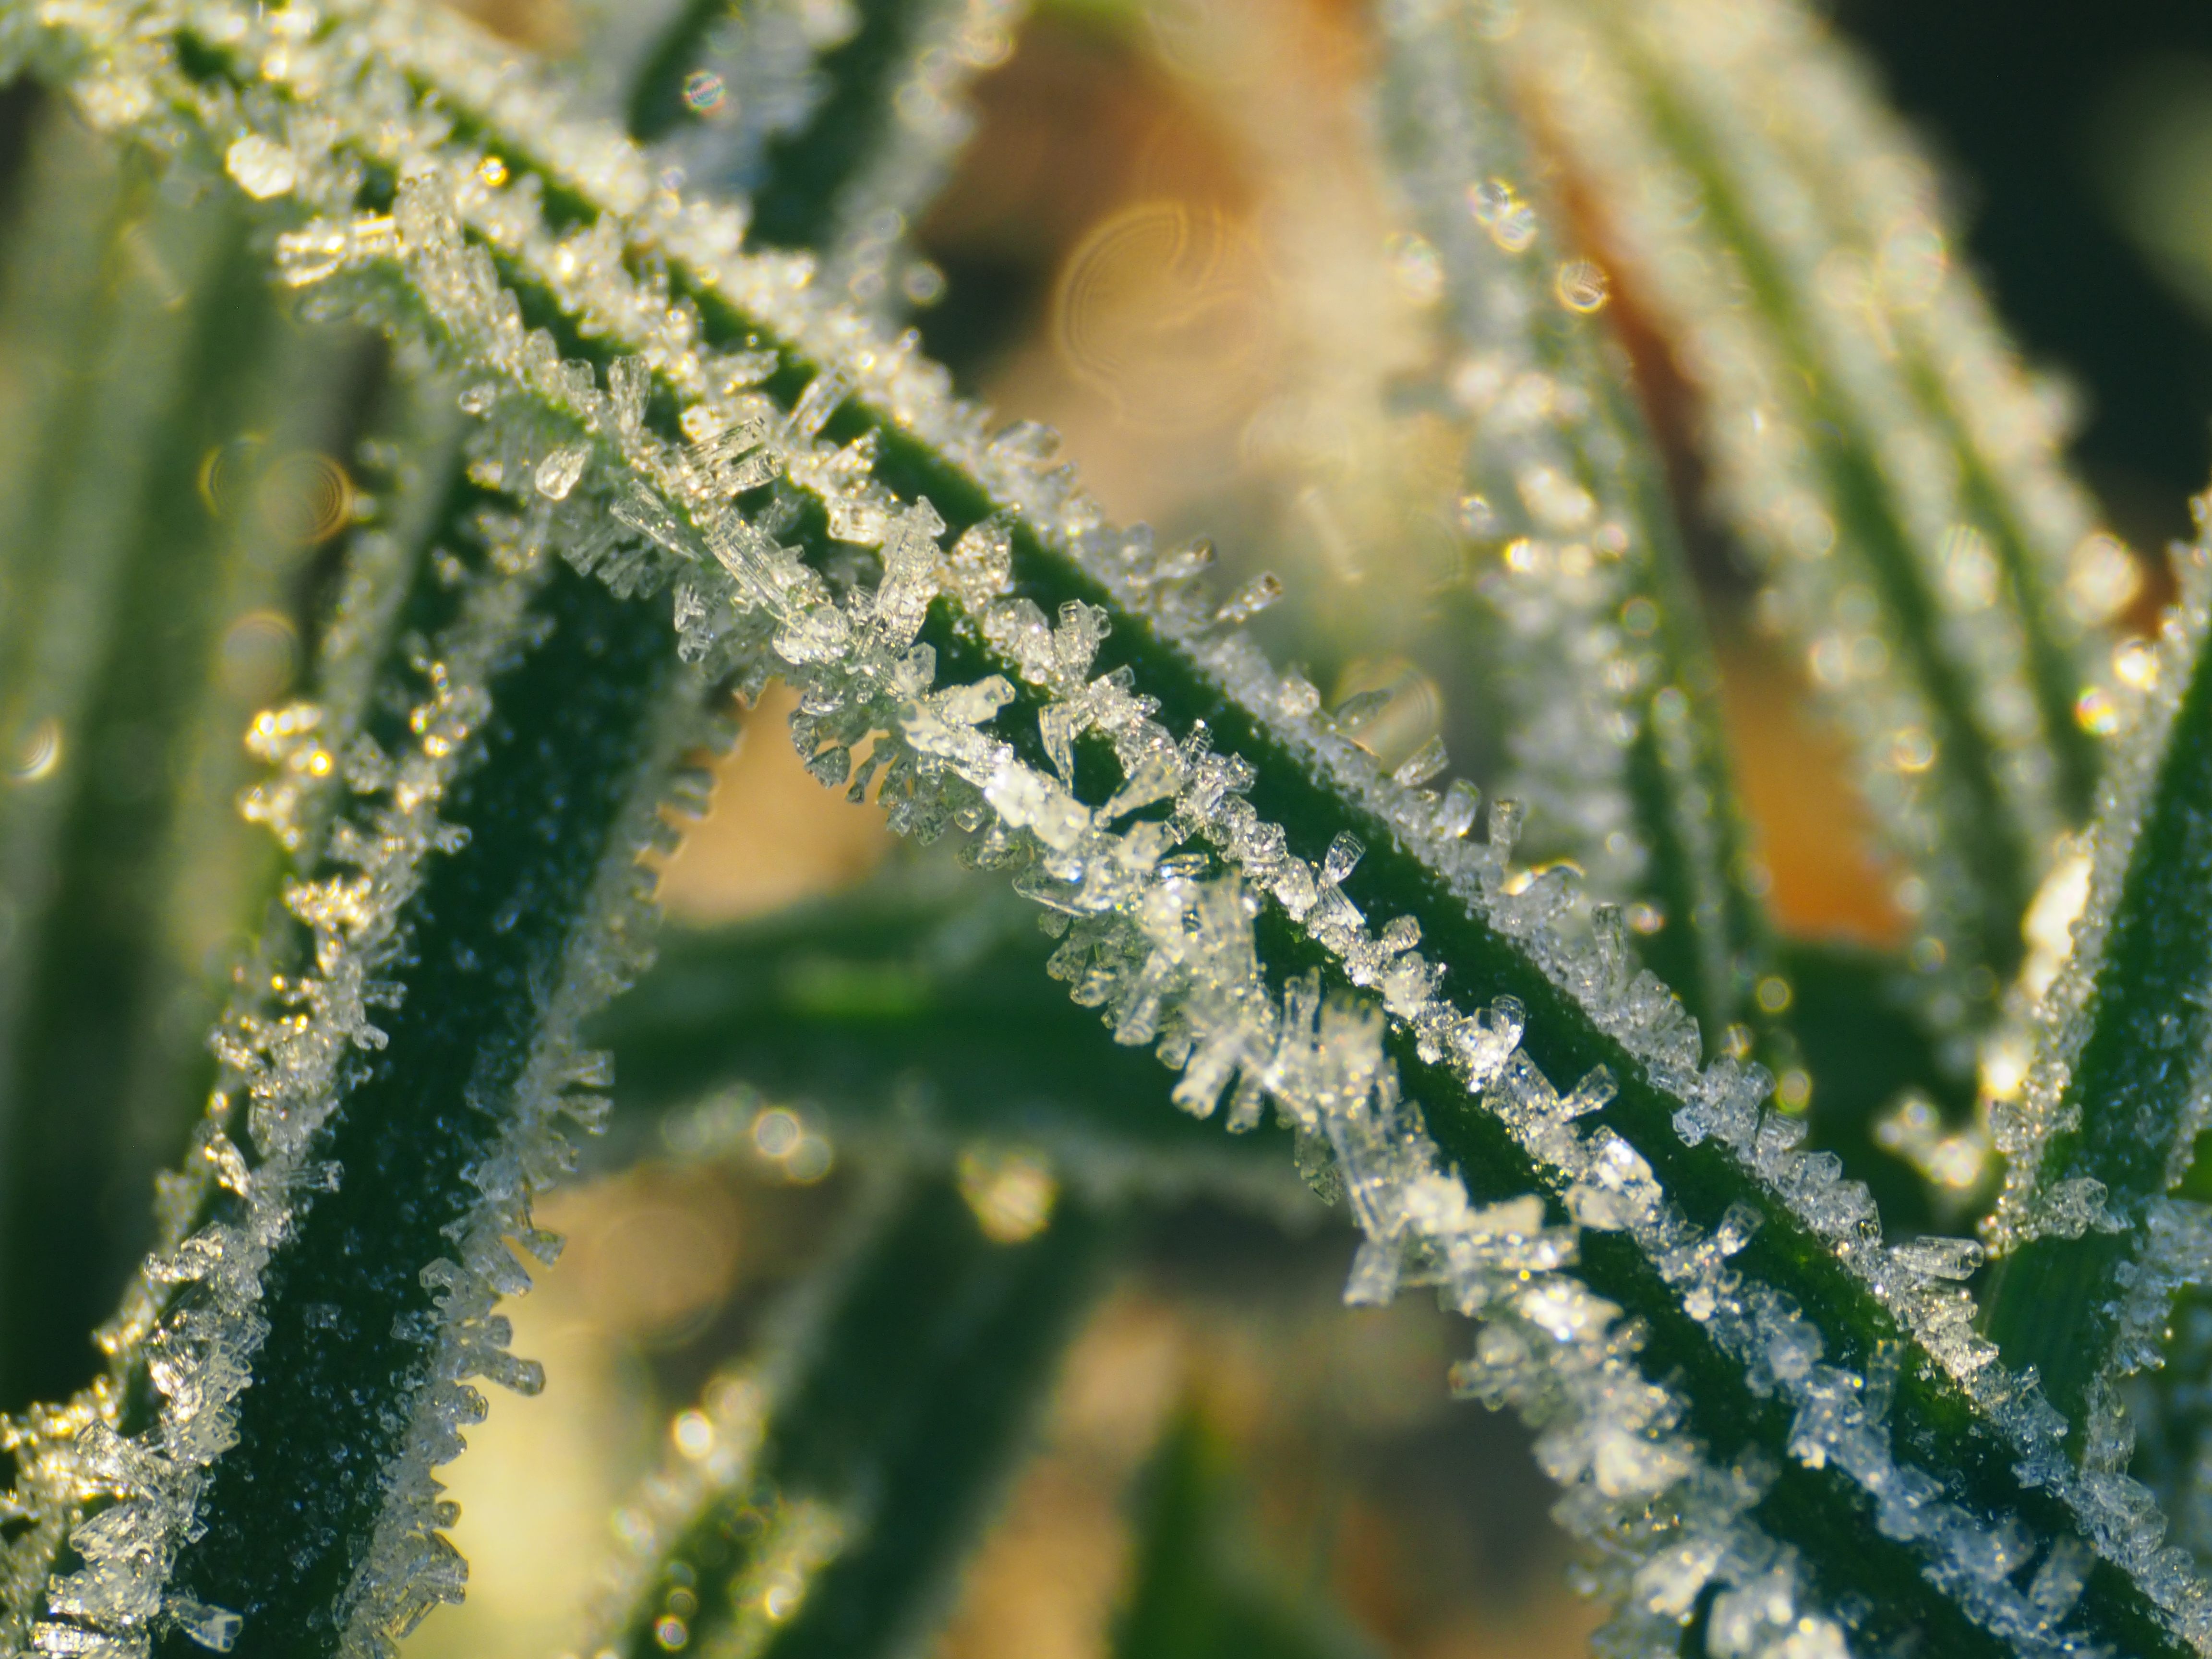
Ice crystals on a blade of grass, 1/80, ISO 1000
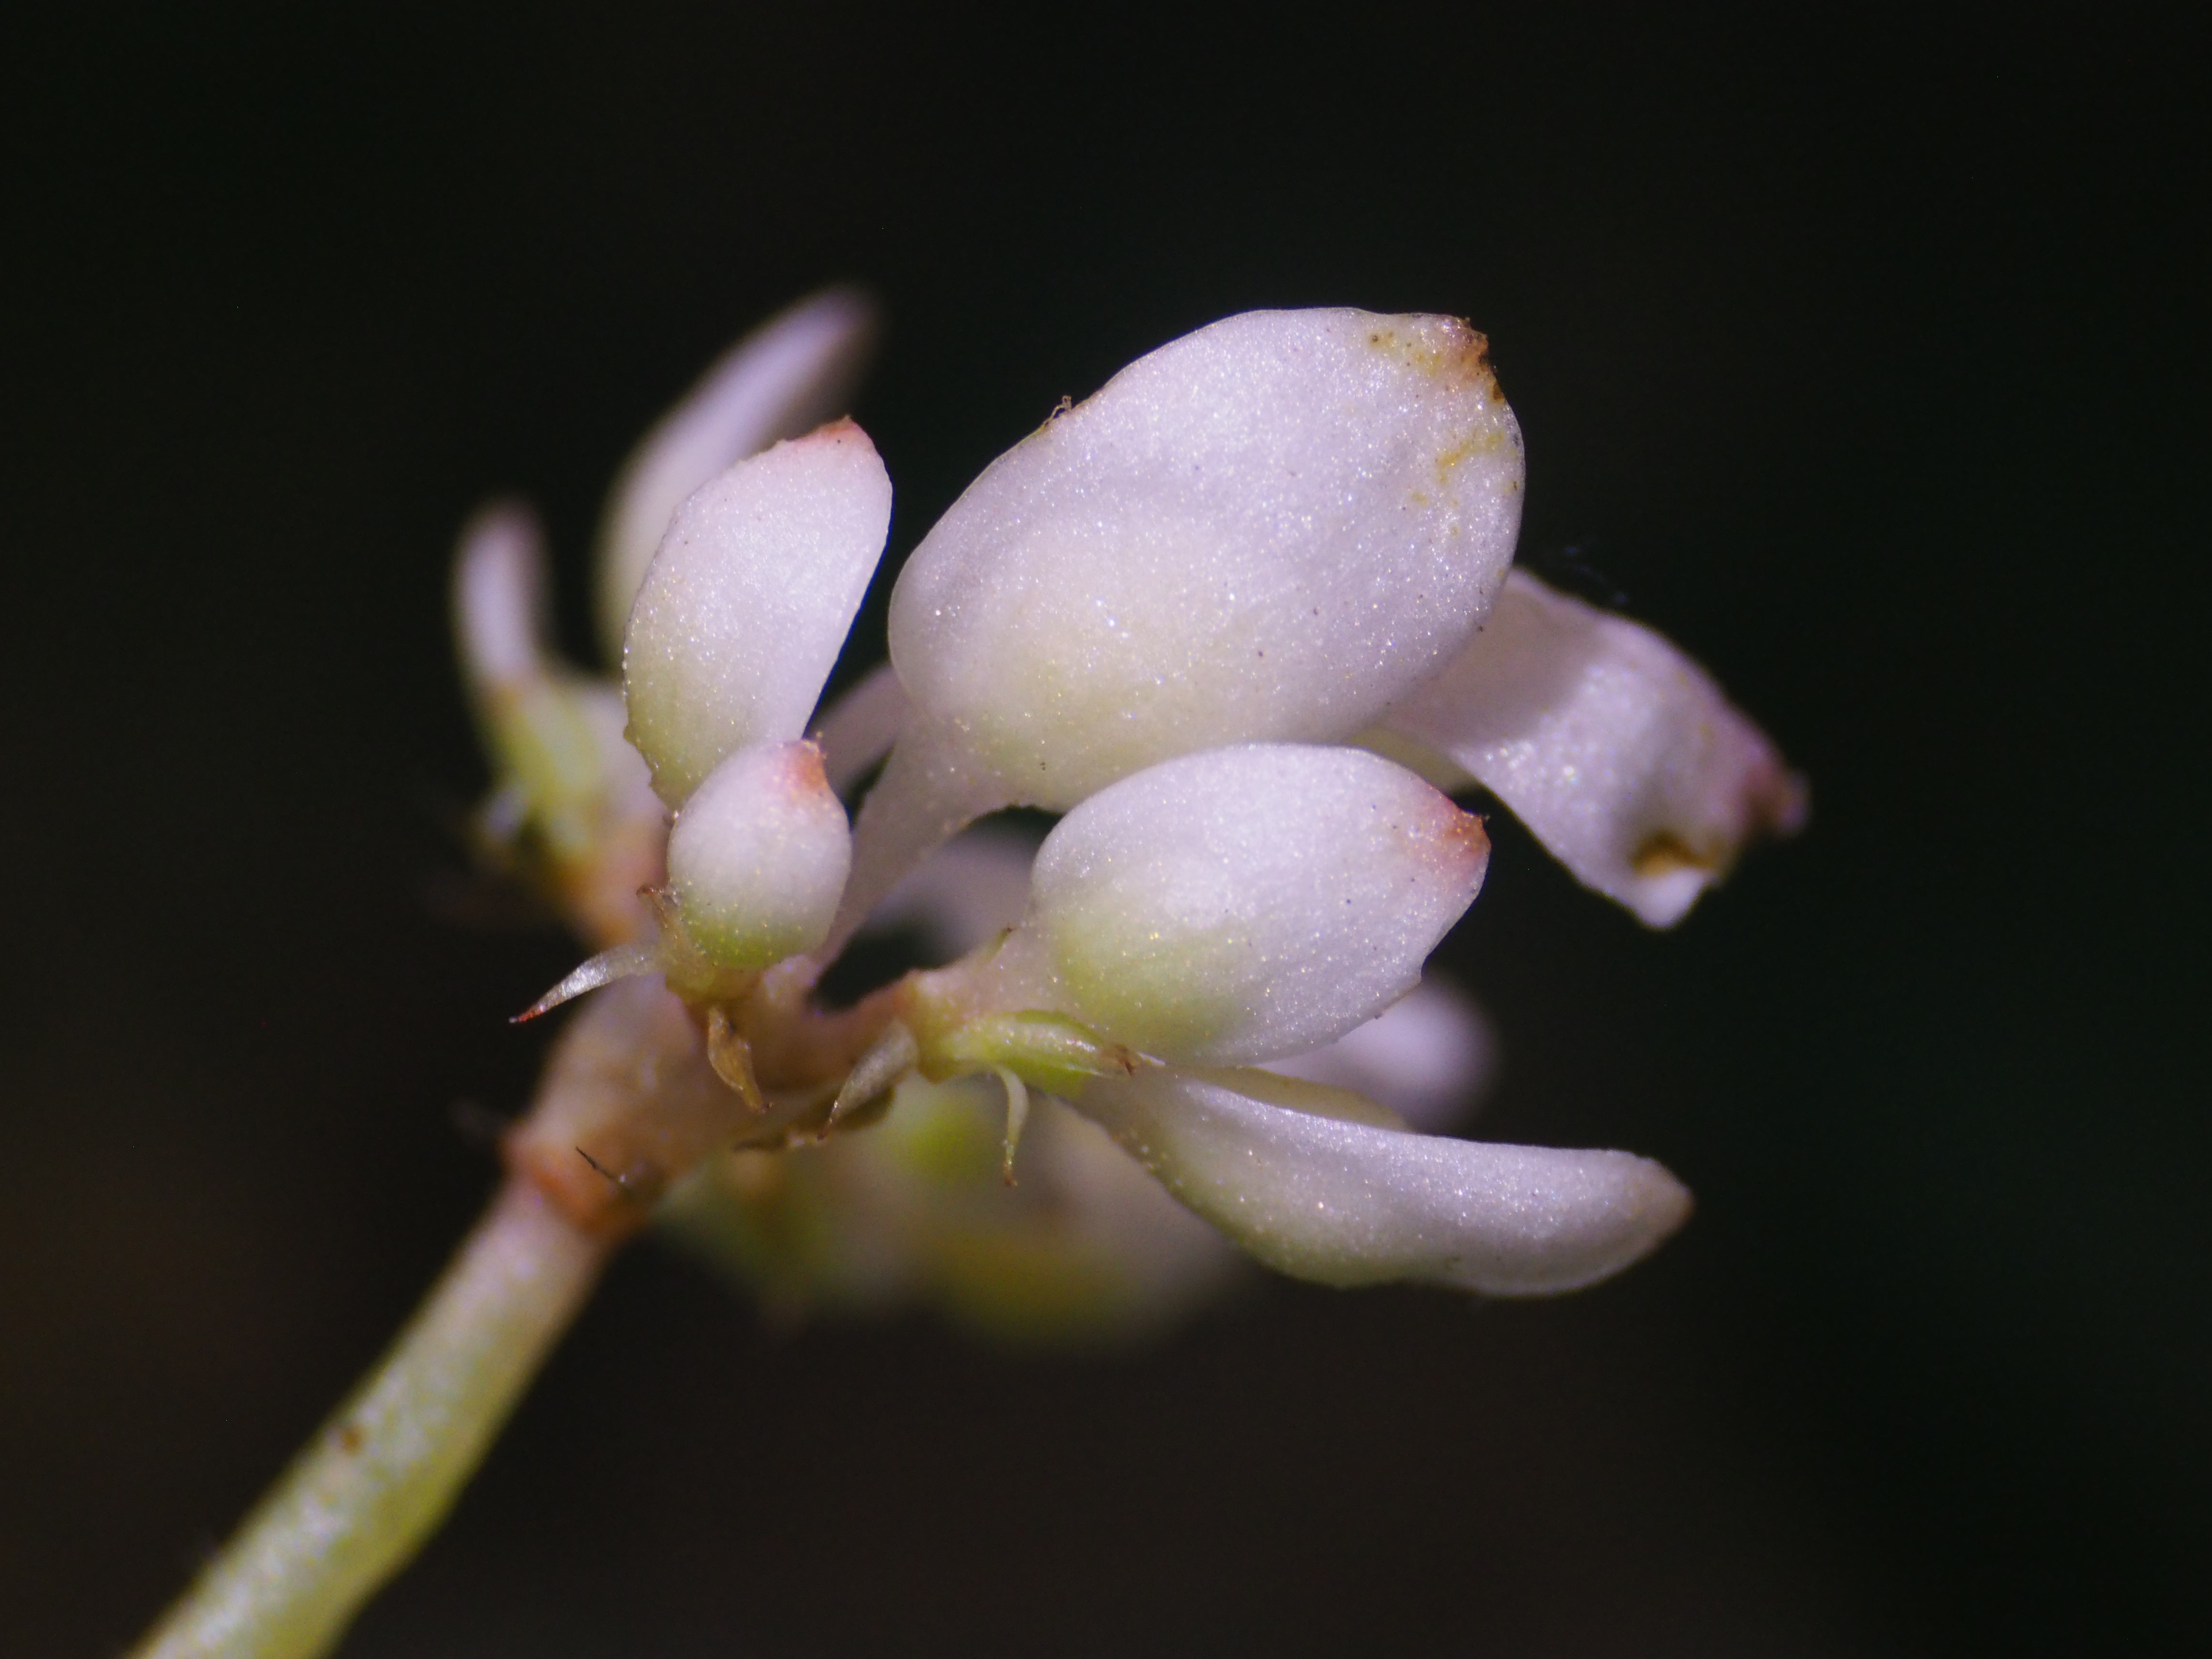
Begonia flower, 1/100, ISO 2000
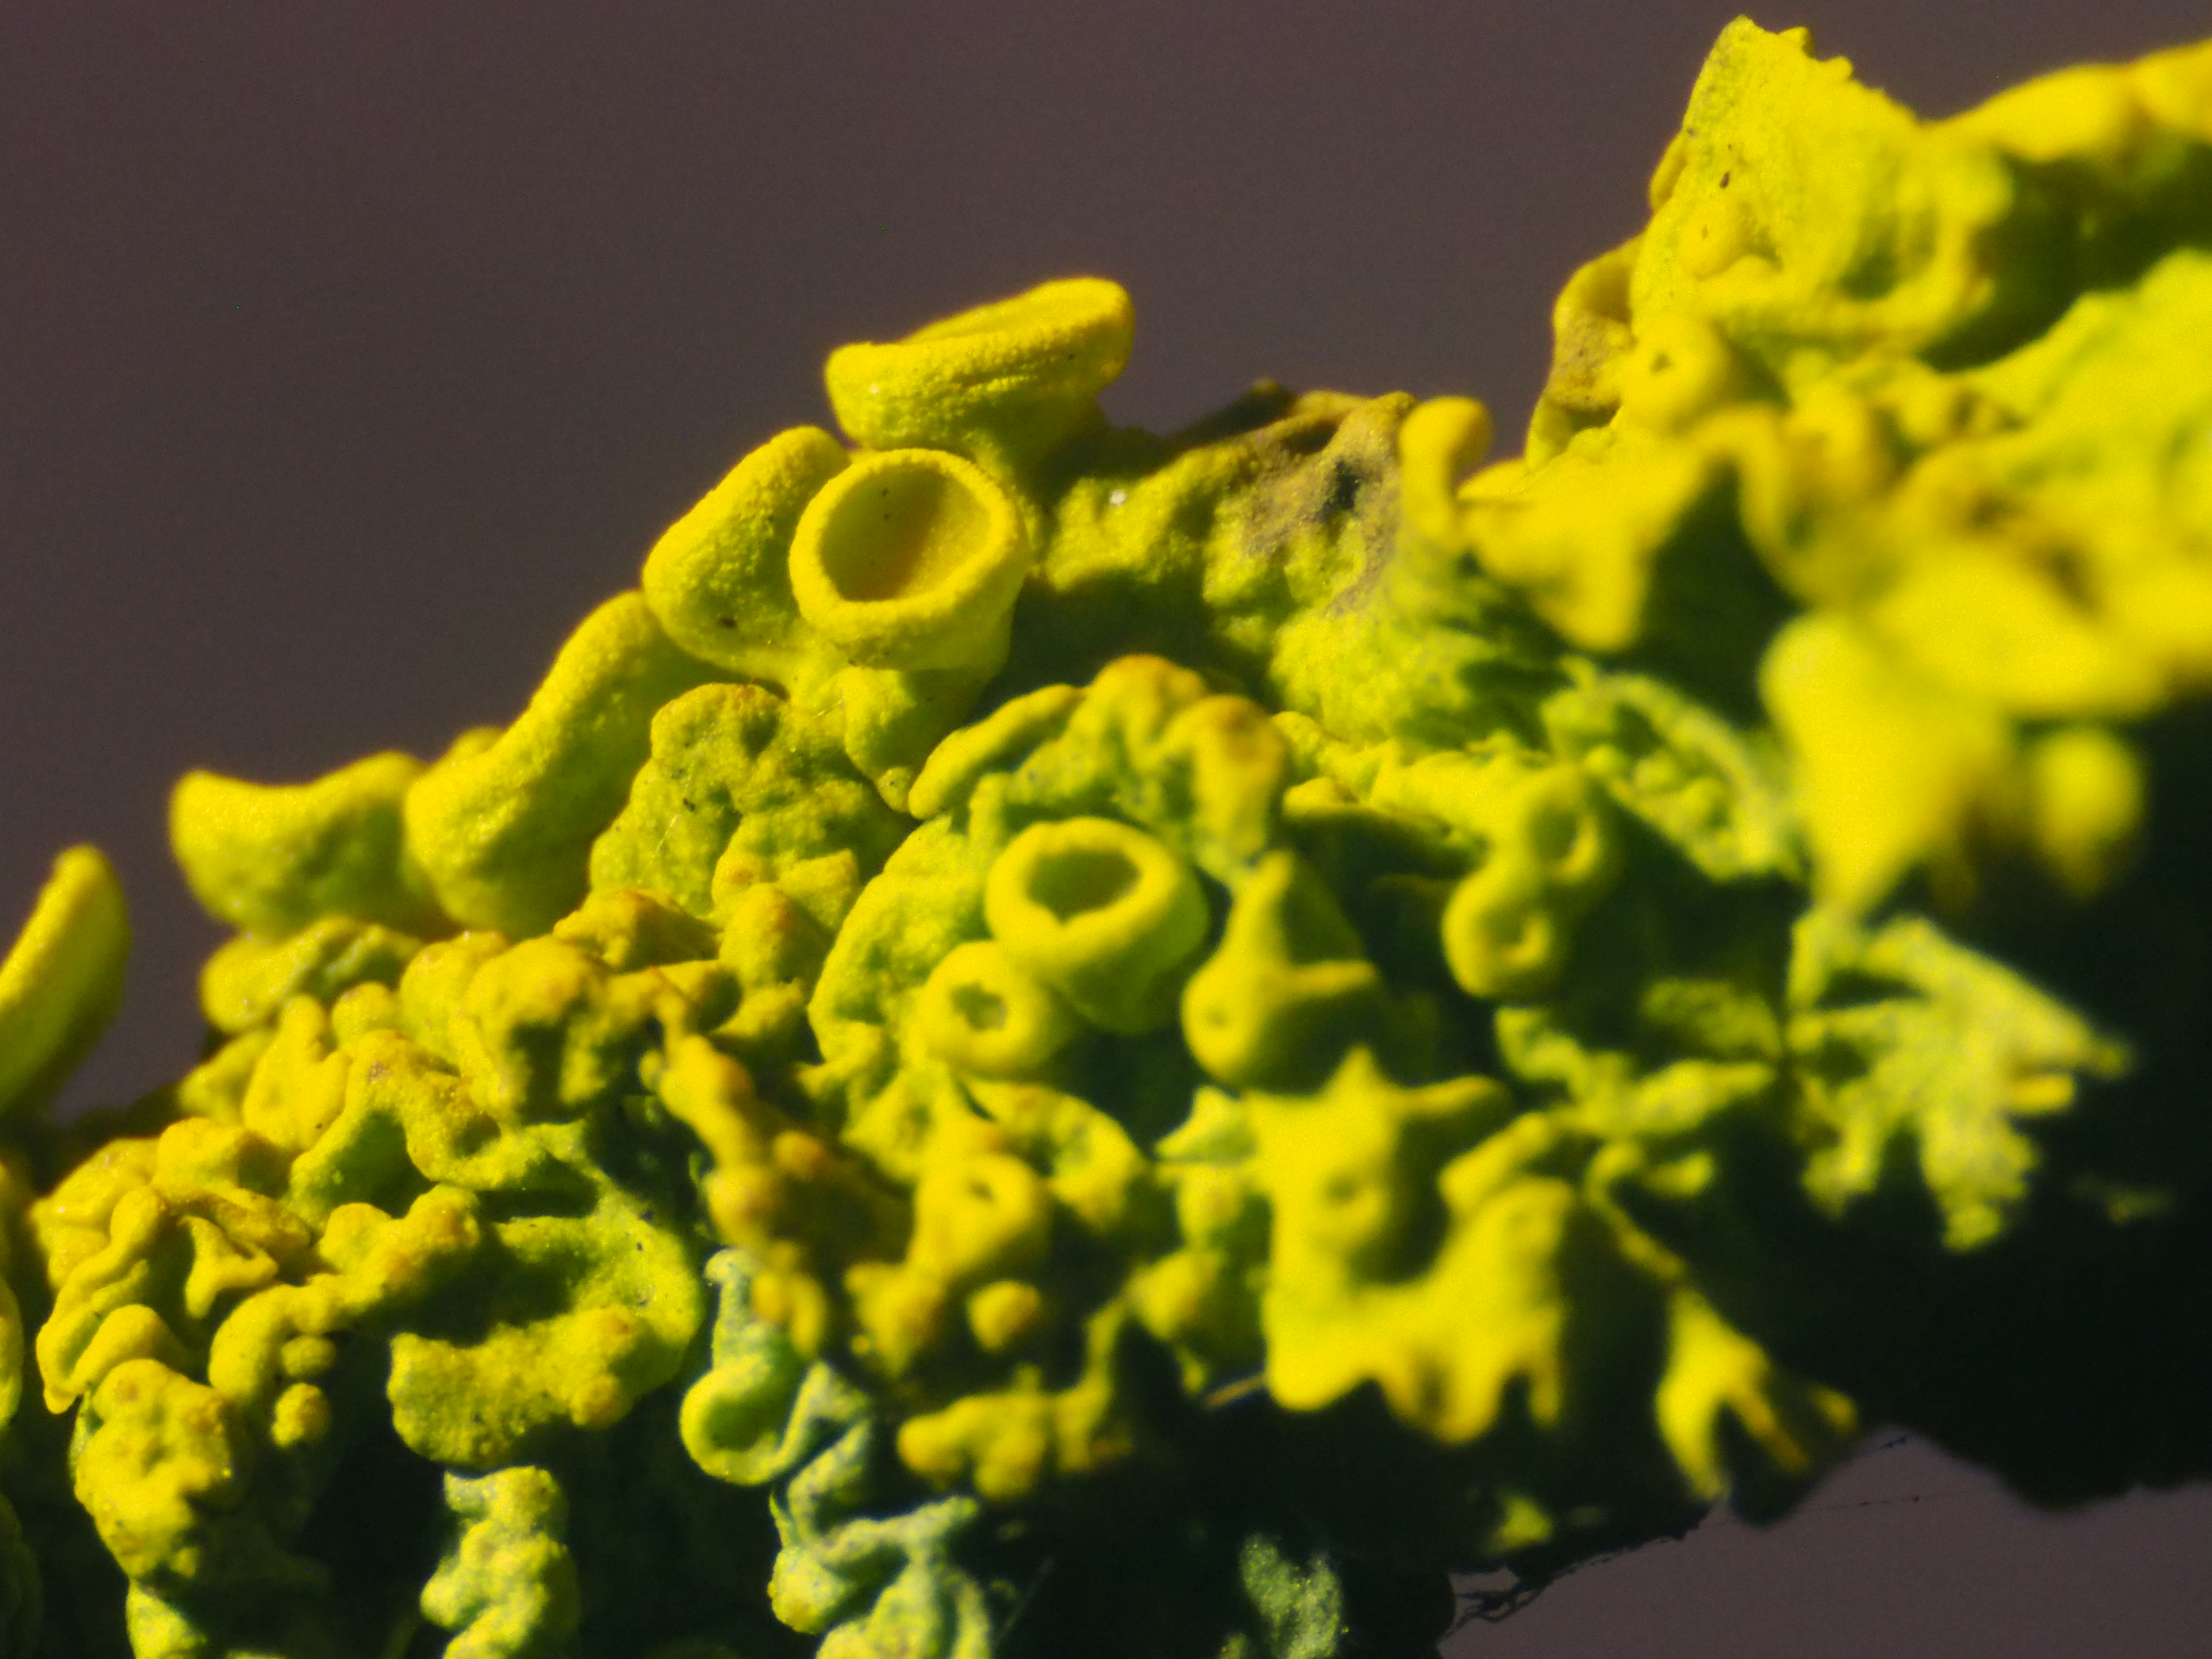
Lichen on a tree, done with an APS Auto Teleplus 2x teleconverter (and a rather bright flashlight illumination), this could have gone better had I not forgotten I had fixed ISO configured, 1/400, ISO 4000
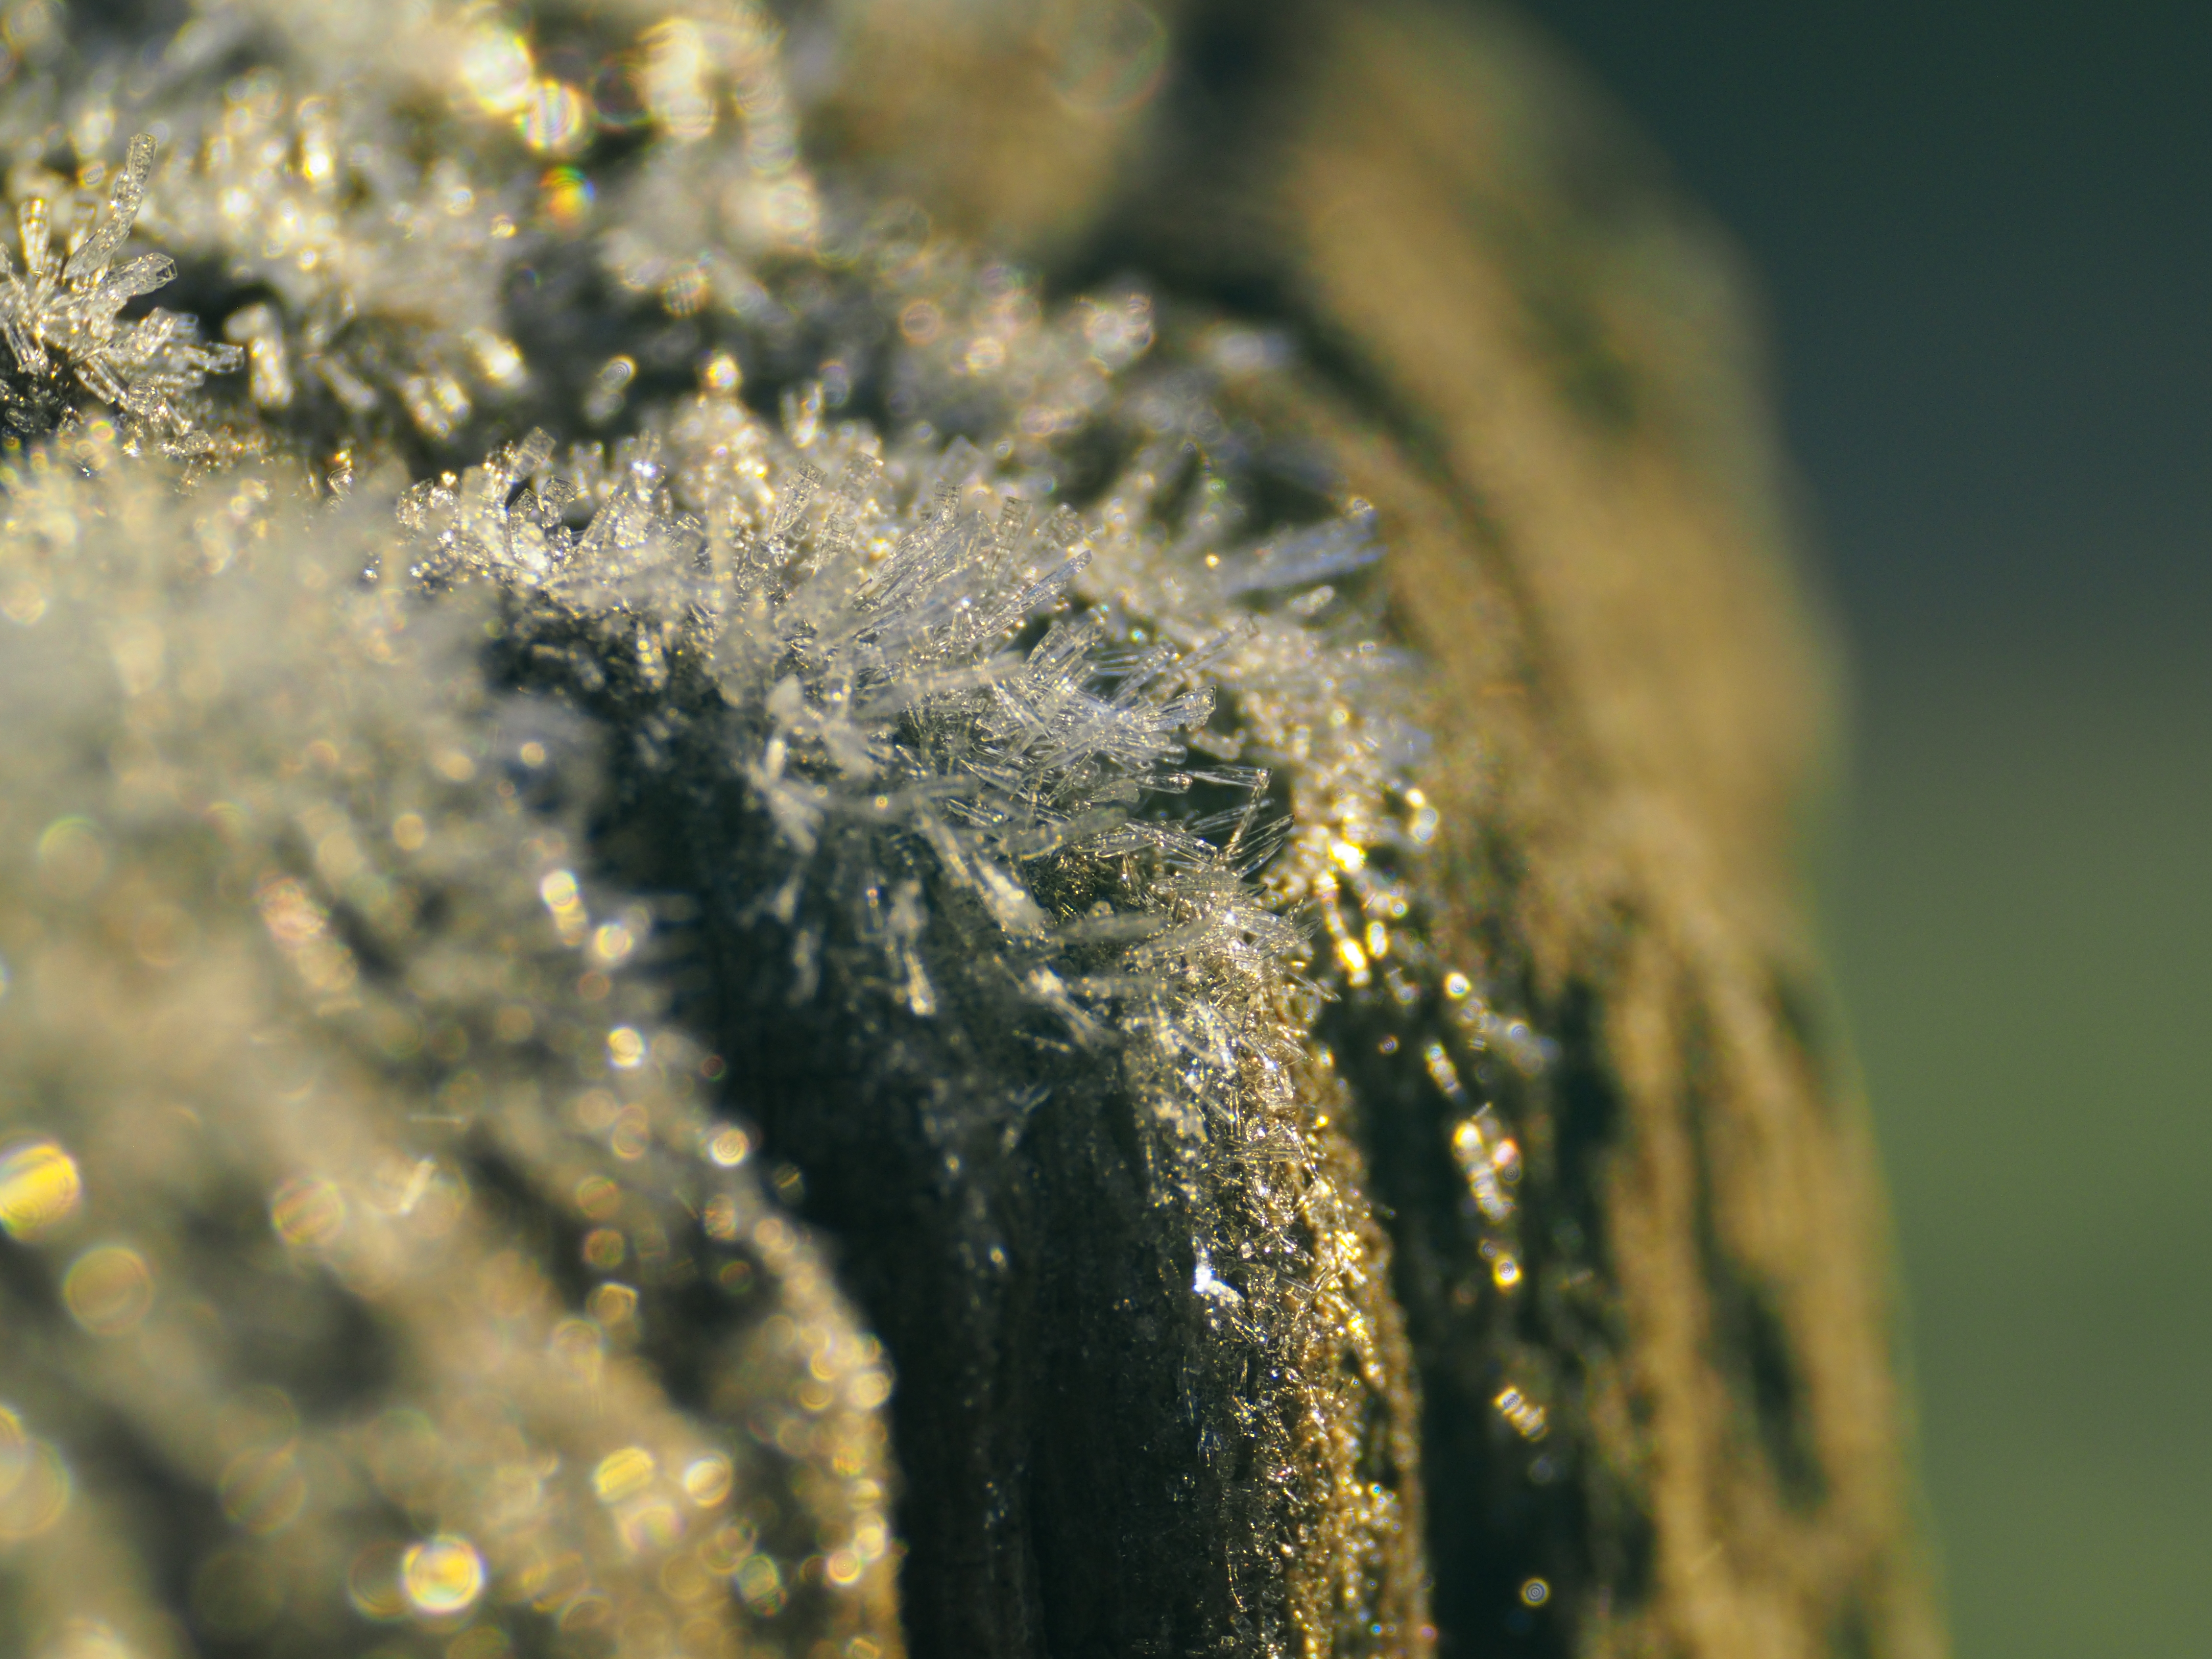
Ice on a wooden stick, 1/125, ISO 640
Subpixel pattern on an old LCD monitor. Here, the axial chromatic aberration is fairly visible if you zoom in at the individual pixels, 1/100, ISO 4000

Forest of ice crystals. Some editing in rawtherapee to improve white balance and contrast. 1/160, ISO 500